Moving VMKernel ports from a DVS back to a normal vSwitch.
Table of Contents
Synopsis
We had a few hypervisors in our configuration that were incorrectly configured with a VMKernel port (VMK) on a distributed virtual switch (DVS). These particular hypervisors had specific requirements to keep those VMK ports assigned to a traditional vSwitch. VMware has an amazingly slick process to move VMKs from a vSwitch into a DVS but unfortunately no way of moving it back to a standard vSwitch. If these management interfaces are either your sole means of access or your primary access then the hypervisor will become disconnected off the network.
To resolve this problem I created a simple shell script that can be copied onto the hypervisor and executed. A few variables will have to be changed within the script to match your environment. I have successfully run this script on dozens of hypervisors in my configuration with zero issues.
The script.
- Create a new vSwitch inside the hypervisor, this can be done command line or GUI. In my case I am calling it “VMwareNetwork” and vSwitch0. Knowing the vSwitch# is important and will be utilized in the script itself.
- Now SSH into your hypervisor to complete the rest of the work.
-
List out the current vSwitch configuration information. Within this information we are looking specifically for the full “DVS name”, “DVPort ID” and the “vmnic#” that we will be re-assiging to the new vSwitch.
esxcfg-vswitch -l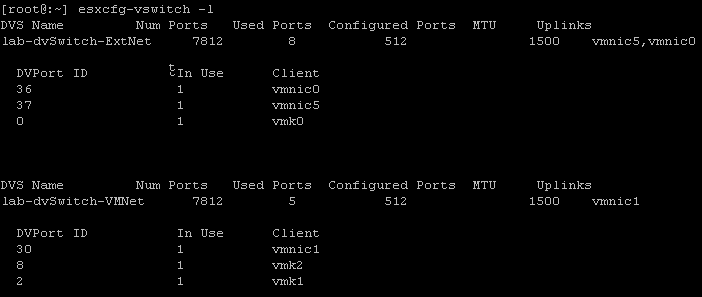
-
List out the current VMKernel configuration information. Within this information we are looking specifically for the “vmk#” and “IP address” of the VMKernel port we are moving.
esxcfg-vmknic -l
-
Next we will create a new shell script called change.sh, change the permissions on it so it can be executed, and then edit the file itself.
touch change.sh chmod 755 change.sh vi change.sh - You will need to update a few things on this script to match your results from above, the legend is below the script. Base Script:
#!/bin/sh echo 'removing the physical adapter' esxcfg-vswitch -Q vmnic# -V Full-dvSwitch-Name -Q vmnic1 -V ## XXXXXXXXXX sleep 2 echo 'assigning adpater' esxcfg-vswitch -L vmnic# vSwitch# sleep 2 echo 'removing old IP info' esxcli network ip interface remove --interface-name=vmk# sleep 2 echo 'recreating port group' esxcfg-vswitch -A "New-VMK-Name" vSwitch# sleep 2 echo 're-assigning IP' esxcfg-vmknic -a -i ###.###.###.### -n 255.255.255.0 -p New-VMK-Name vmk# # Full-dvSwitch-Name = the full DVS name as shown from esxcfg-vswitch -l command. # vmnic# = the physical adapter number as shown from esxcfg-vswitch -l command. # '##' = the DVPort ID # as shown from esxcfg-vswitch -l command. # XXXXXXXXXX = the full DVS name as shown from esxcfg-vswitch -l command. # vSwitch# = the vSwitch ID number that you will be moving this VMK to. # vmk# = the Interface as shown from the esxcfg-vmknic -l command. # New-VMK-Name = The new port group name you will be calling this. # ###.###.###.### = The IP address that is being re-assigned to the VMK as shown from the esxcfg-vmknic -l command.- Full-dvSwitch-Name = the full DVS name as shown from esxcfg-vswitch -l command.
- vmnic# = the physical adapter number as shown from esxcfg-vswitch -l command.
- ’##’ = the DVPort ID # as shown from esxcfg-vswitch -l command.
- XXXXXXXXXX = the full DVS name as shown from esxcfg-vswitch -l command.
- vSwitch# = the vSwitch ID number that you will be moving this VMK to.
- vmk# = the Interface as shown from the esxcfg-vmknic -l command.
- New-VMK-Name = The new port group name you will be calling this.
- ###.###.###.### = The IP address that is being re-assigned to the VMK as shown from the esxcfg-vmknic -l command.
NOTE: You might have to change the subnet mask to match your network requirements.
-
Now save the script and then execute it by running:
.\change.shNOTE: If the IP address you are using to SSH into the hypervisor is the one being adjusted then you will be disconnected for a short time period. So long as you have entered the variables correctly then the script will complete successfully and you will be automatically rejoined to the SSH session with the scripted prompts displaying.
-
Finally we will want to delete the script we created.
rm -rf change.sh
Example script.
Here is a full script example using the screenshots above with all variables filled in.
#!/bin/sh
echo 'removing the physical adapter'
esxcfg-vswitch -Q vmnic1 -V 30 lab-dvSwitch-VMNet
sleep 2
echo 'assigning adpater'
esxcfg-vswitch -L vmnic1 vSwitch0
sleep 2
echo 'removing old IP info'
esxcli network ip interface remove --interface-name=vmk1
sleep 2
echo 'recreating port group'
esxcfg-vswitch -A "VMwareNetwork-Mgmt" vSwitch0
sleep 2
echo 're-assigning IP'
esxcfg-vmknic -a -i 192.168.101.15 -n 255.255.255.0 -p VMwareNetwork-Mgmt vmk1