Table of Contents
Summary
In this process we will be upgrading vCenter server 7.0 to the latest vCenter server 7.0 U3d. This update includes the Log4J patches to ensure that vulnerability is not present within your environment. This procedure is written assuming the vCenter is 100% network isolated and does not have access to directly download from VMware.com to apply updates. My average upgrade time is around one hour with some taking as long as two hours.
VMware Documentation
vCenter 7.0 Update 3d release notes.
Prerequisites
- Confirm the existing vCenter is working as expected and there are no errors or issues.
- All hypervisors have to be running ESXi 6.5 or newer.
- All VDS need to be at least 6.5.0. You can get the versions of DVS by running the command ‘Get-VDSwitch’ via PowerCLI.
- Make sure all of your hypervisors are connected to the vCenter. Any disconnected hypervisors or disabled hypervisors should be addressed prior to starting to ensure best possible outcome.
- Create the following as part of the backout/rollback plan:
- Create a manual backup of your vCenter through the VAMI.
- Create a clone of vCenter VM.
- Create a snapshot of the vCenter VM.
- Ensure you have plenty of storage on the vCenter virtual appliance by logging into the shell and running the commands ‘df -h’ and looking at the output. You can also run ‘du -x -d1 -h’ which can tell you where there is large space being consumed at. You can also sort files via total file size by using ‘ls -Shal’. Frequently you will find lots of files that can be purged in order to ensure you have plenty of space.
- If your root password of the appliance has not been recently changed then log in and confirm it has not expired. If it has then change it prior to starting the upgrade process. To do this log into the vCenter Appliance webpage at https://IP-Address:5480
- vCenter License - will NOT need to be upgraded.
- Download locations:
- vCenter 7.0 Update 3d
- Look for ‘VC’ and select ‘VC-7.0u3d’
- Download ‘VMware-vCenter-Server-Appliance-7.0.3.00500-19480866-patch-FP.iso’
Upgrade vCenter 7.0 to vCenter 7.0U3d
- Download the upgrade-script.iso, located here, to the jump box and mount it to the vCenter appliance.
- Log into the VAMI, click on services, and scroll down to ‘vSan health Service’ and set it to manual startup type and stop the service.
- Log into the vCenter via SSH, gain shell access and mount the upgrade-script CD ROM.
shell mount /dev/cdrom /mnt/cdrom - Copy the upgrade script to the /tmp/ directory.
cp /mnt/cdrom/KB_83145_PatchCleanupScript.sh /tmp/ - Change the directory to /tmp/
cd /tmp/ - Change the file to be executable.
chmod +x KB_83145_PatchCleanupScript.sh - Run the script and press ‘Y’ when asked.
./KB_83145_PatchCleanupScript.sh - Clean up the vSAN service historical health information database tables. This allows services to start quicker allowing for highest chance of success on service-startup timeouts.
/usr/bin/dbcc -fbss embedded - Stop the applmgmt, vmdird, and vmware-updatemgr services.
service-control --stop applmgmt vmdird vmware-updatemgr - Reset the update manager database and delete the old patch files. This allows the update manager service to start quicker allowing for highest chance of success on service-startup timeouts.
/usr/lib/vmware-updatemgr/bin/updatemgr-utility.py reset-db rm -rf /storage/updatemgr/patch-store/* - Run commands for vmdir.password and vmdir.username.
/bin/install-parameter -s vmdir.password /bin/install-parameter -s vmdir.username - Purge any old software updates existing on the appliance.
rm -rf /storage/core/software-update/updates/* rm -rf /storage/core/software-update/stage/* - Relocate the software_update_state.conf file.
mv /etc/applmgmt/appliance/software_update_state.conf /storage/core - Configure the database timeout. This allows for longer time cycle in order for the database changes to take place.
cd / /opt/likewise/bin/lwregshell set_value '[HKEY_THIS_MACHINE\Services\vmdir\Parameters]' "CopyDbIntervalInSec" "0" - Start the services back up.
service-control --start applmgmt vmdird vmware-updatemgr - Attach the VMware-vCenter-Server-Appliance-7.0.3.00500-19480866-patch-FP.iso file to the vCenter appliance CD-ROM.
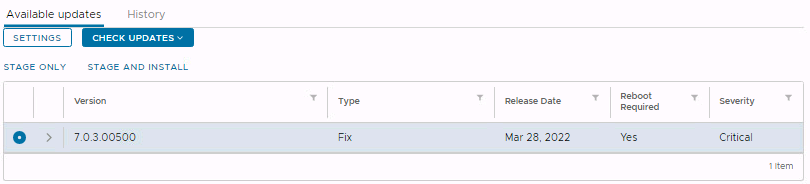
- Log into the VAMI and click on ‘update’ and wait for it to display information. If nothing appears click on the ‘Check updates’ and select ‘Check CD ROM’. Ensure 7.0.3.00500 is selected and click on the ‘Stage and Install’.
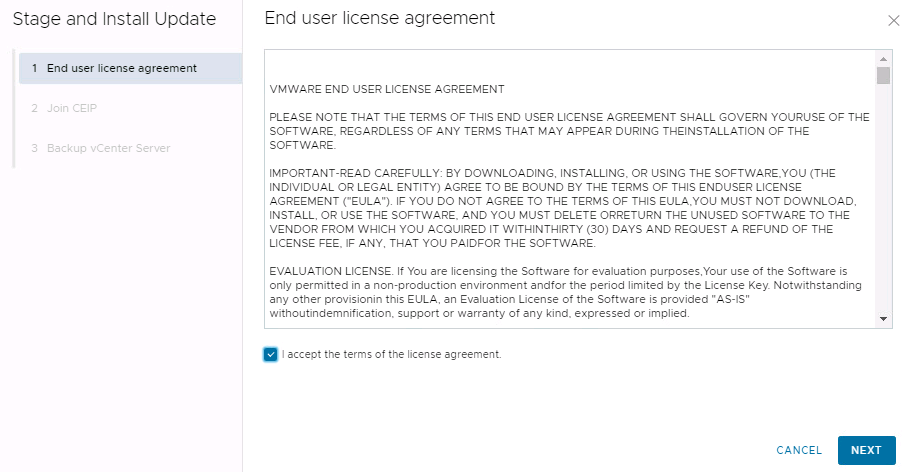
- Accept the EULA and select ‘next’.
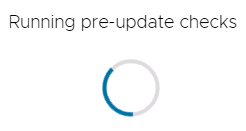
- Allow the prechecks to run and complete.
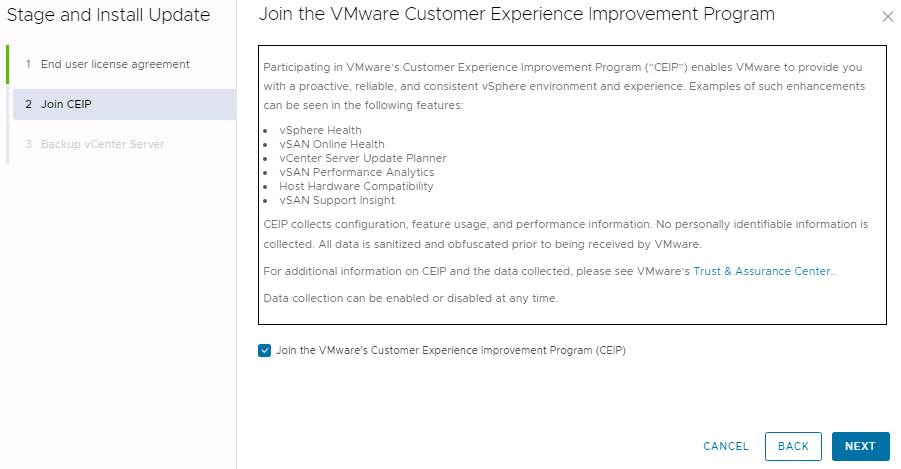
- If asked join the CEIP program and select ‘next’.
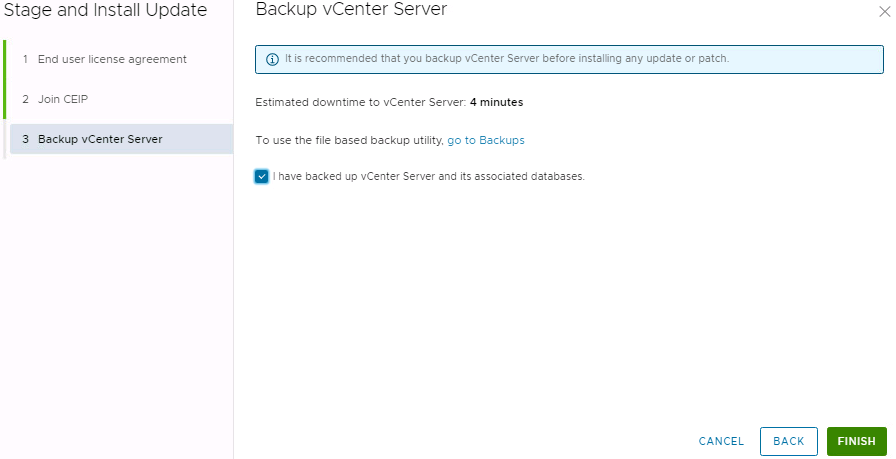
- Ensure you have backed up the vCenter earlier and select that you have, then click finish.
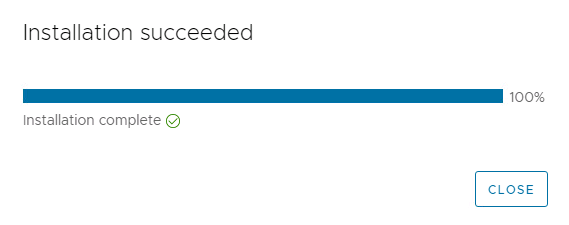
- Allow the process to proceed. The vCenter will reboot at the very end of the process after which you can log back into the VAMI and vCenter.
NOTE: If your vCenter uses vSAN then you have to log back into the VAMI, start the service, and configure it to automatic startup type. If you do not use vSAN then it’s fine to leave the service disabled.
Backout/Rollback Plan
- Revert to the snapshot created at the first upgrade step. Confirm the snapshot allowed the configuration to come back online, if it does not then proceed to next step.
- Restore the clone that was created in the second upgrade step. Confirm the clone allowed the configuration to come back online, if it does not then proceed to next step.
- Create a new vCenter appliance and restore backups created in VAMI interface. Confirm this step allows the vCenter to come back online, if it does not then proceed to next step.
- Contact VMware customer service by creating a new Service Request.