Table of Contents
- Table of Contents
- VMware Product Upgrade Order:
- VMware Product Downloads:
- VMware Documentation Regarding New Versions:
- Prerequisite:
- vCloud Director 8.20 to 9.5.0.1 upgrade process.
- Upgrade NSX from 6.2.4 to 6.4.4
- vCenter Upgrade from 6.0 u3e to 6.7 Update 1b
VMware Product Upgrade Order:
vRA -> vRO -> vRB -> vROPs -> vRLI -> vRLI Agent -> vROps -> EPOps -> vADP-based Backup solution -> vCloud Director -> NSX-v -> External PSC -> vCenter Server -> VUM -> VR -> SRM -> UMDS -> ESXi -> VMware Tools -> Virtual Hardware -> VSAN/VMFS
VMware Product Downloads:
- NSX 6.4.4 - Download link: https://tinyurl.com/y4hvtecm
- vCenter 6.7 Update 1b - Download link: https://tinyurl.com/yb9o9d3s
- vCloud Director 9.5.0.1 - Download link: https://tinyurl.com/y3pxzccr
VMware Documentation Regarding New Versions:
- vCenter 6.7 Update 1b release notes: https://docs.vmware.com/en/VMware-vSphere/6.7/rn/vsphere-vcenter-server-67u1b-release-notes.html
- NSX 6.4.4 release notes: https://docs.vmware.com/en/VMware-NSX-Data-Center-for-vSphere/6.4/rn/releasenotes_nsx_vsphere_644.html
- vCloud Director 9.5 release notes: https://docs.vmware.com/en/VMware-vCloud-Director-for-Service-Providers/9.5/rn/vmware-vcloud-director-for-service-providers-95-release-notes.html
- Upgrade 6.7 considerations: https://blogs.vmware.com/vsphere/2018/04/upgrade-considerations-vmware-vsphere-6-7.html
- Update sequence for vSphere 6.7 and its compatible VMware products: https://kb.vmware.com/s/article/53710
- vCenter 6.7 compatibility matrix: https://www.vmware.com/resources/compatibility/sim/interop_matrix.php#interop&2=&1=&29=2835&93=
- vCloud Director 9.5 tenant portal: https://docs.vmware.com/en/vCloud-Director/9.5/vcd_95_tenantportal.pdf
- vCloud Director 9.5 new items: https://blogs.vmware.com/vcloud/2018/11/vmware-vcloud-director-9-5-the-new-features-in-detail.html
- Nested ESXi for testing: https://www.virtuallyghetto.com/2017/05/updated-nested-esxi-6-0u3-6-5d-virtual-appliances.html
Prerequisite:
- Make sure all of your hypervisors are connected to the vCenter and vCloud Director sees all devices. Any disconnected hypervisors or disabled hypervisors should be addressed prior to starting.
- Create a manual backup of your vCloud Director database and save this database to a remote location.
- Create a backup of NSX manager and save to a remote location.
- Create a clone of all VMs to restore to if needed. Creating a clone for all will ensure you have a restore point in case things go badly.
- Create a snapshot of all VMs you will be changing data on, except vCenter server.
- Upgrade all Distributed Virtual Switches to 6.0.0 or better. You can get the versions of DVS by running the command ‘Get-VDSwitch’ via PowerCLI.
- If you are currently using the vCenter appliance, ensure you have cleared up as much space as possible. Running the commands ‘df -h’ and ‘du -x -d1 -h’ can generally tell you where there is large space being consumed at. You can also sort files via total file size by using ‘ls -Shal’. Frequently you will find lots of files that can be purged, including in /var/log/audit and /usr/lib/vmware-sca/wrapper/bin and /storage/core
- If your root password of the appliance has not been recently changed then it is recommended to change it at this time prior to the upgrade process. To do this log into the vCenter Appliance webpage at https://IP-Address:5480.
- Licenses:
- vCenter License - Should NOT need to be upgraded.
- NSX License - Should NOT need to be upgraded.
- vCloud Director - DOES need to be upgraded.
vCloud Director 8.20 to 9.5.0.1 upgrade process.
NOTE: If your vCloud Director has any vCloud network isolation (VCDNI) networks setup in the “Network Pools” section then these will need to be either converted to VXLAN networks or removed entirely. VMware has a great document on how to convert the networks located here: https://kb.vmware.com/s/article/2148381
- Create a snapshot of the vCloud Director VM to restore to in case of a failure.
- If your vCloud Director (VCD) has access to the internet then you can wget the files from the URL https://tinyurl.com/y9mbcf4z
- If your VCD does not have access to the internet then download the package and make an ISO out of it, for this tutorial I have called mine “vCloudDirector9.5.iso”
- Mount the ISO you just created to the VM container.
- Log into the guest OS, if you have the ability then log fully into root. If you cannot log fully into root then you will need to sudo the following commands.
- Make a mount directory for the cd rom:
mkdir /mnt/cdrom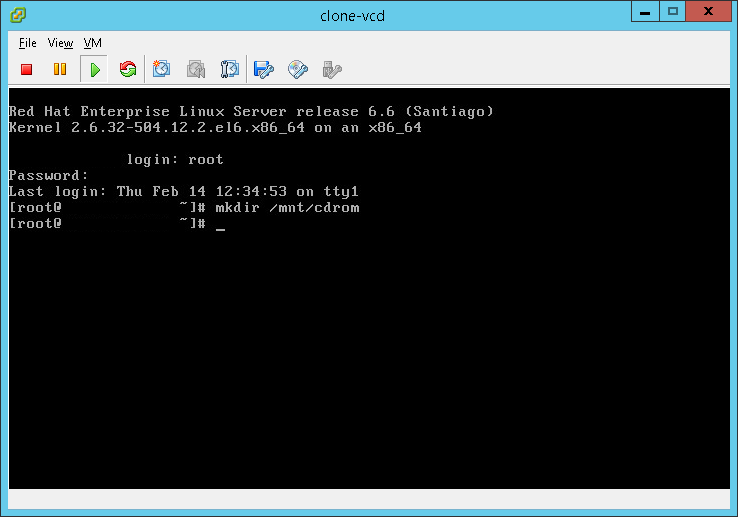
- Mount the cdrom into the directory you just created:
mount /dev/cdrom /mnt/cdrom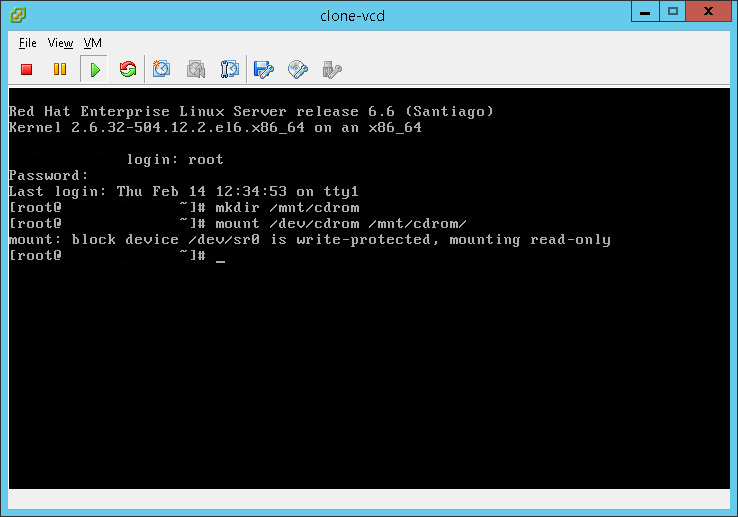
- Copy the .bin file to your local file system so we can utilize it:
cp /mnt/cdrom/vmware-vcloud-director-distribution-9.5.0-11038216.bin /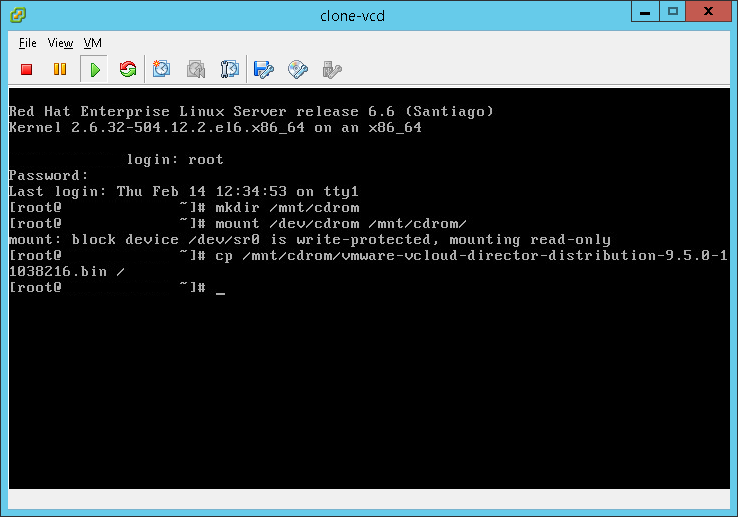
- Update the file to make it executable:
chmod u+x /vmware-vcloud-director-distribution-9.5.0-11038216.bin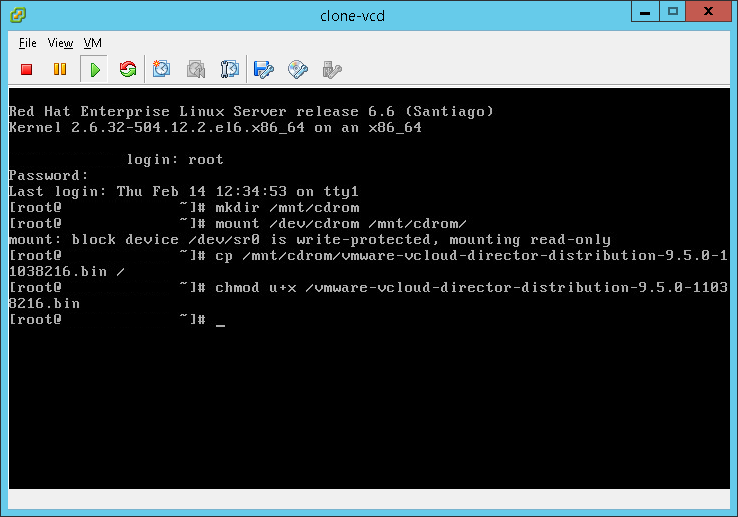
- Check the current status of VCD services on your machine:
/opt/vmware/vcloud-director/bin/cell-management-tool -u administrator -p PassWord cell -status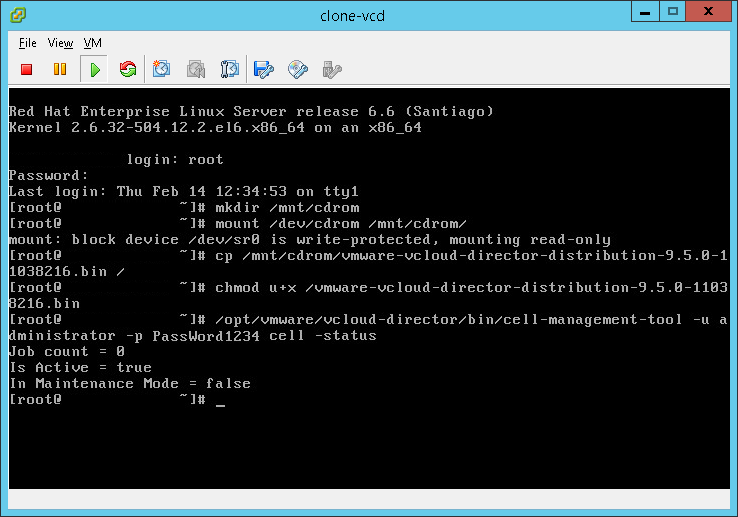
- Halt VCD from executing futher commands and complete any current changes in its queue: NOTE: This might take a while to complete.
/opt/vmware/vcloud-director/bin/cell-management-tool -u administrator -p PassWord cell -quiesce true
- Check the status of VCD “Is Active” status, after the -quiesce command runs it should be ‘false’
/opt/vmware/vcloud-director/bin/cell-management-tool -u administrator -p PassWord cell -status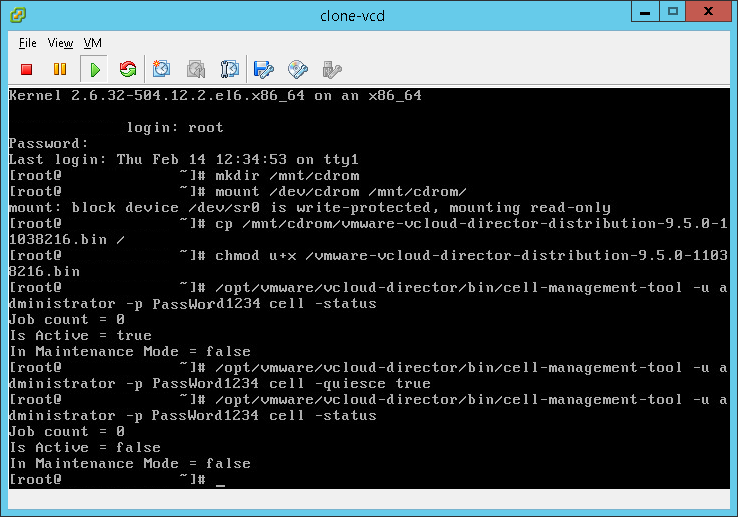
- Shutdown the VCD services:
/opt/vmware/vcloud-director/bin/cell-management-tool -u administrator -p PassWord cell -shutdown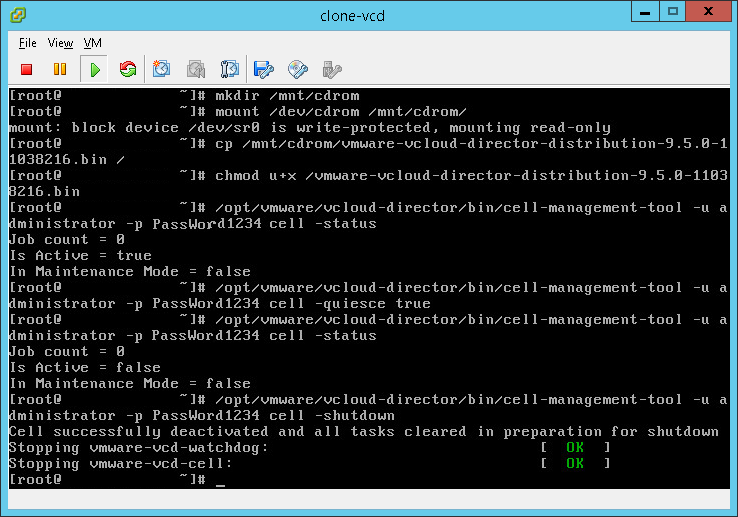
- Create a manual backup of your vCloud Director database and save this database to a remote location.
- CD into root:
cd /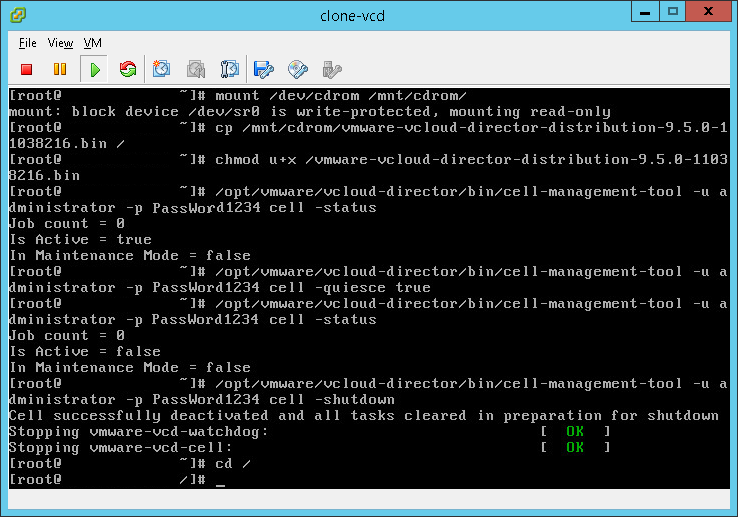
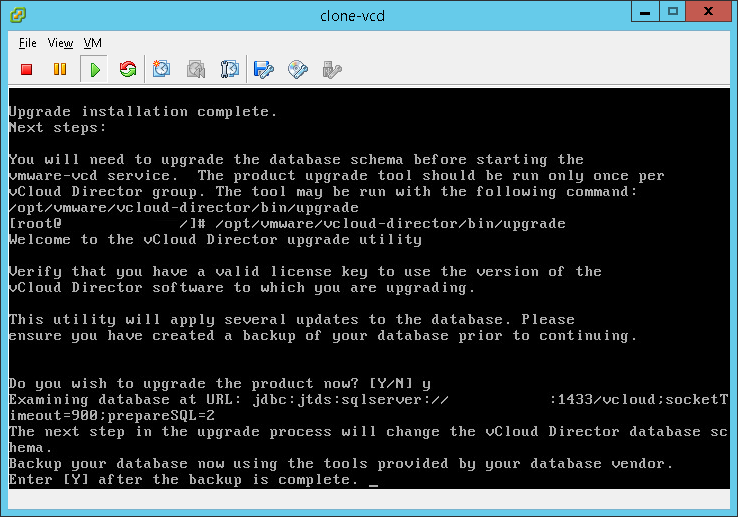
- Start the upgrade process:
./vmware-vcloud-director-distribution-9.5.0-11038216.bin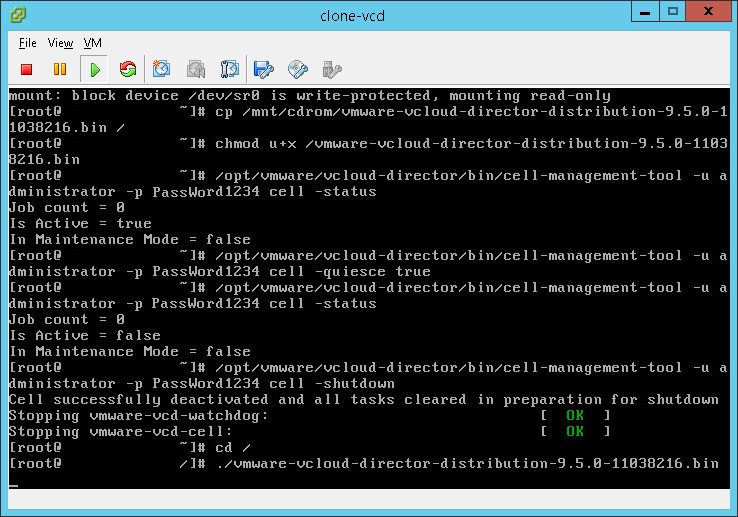
- The process will start, it will first check disk space to make sure there is enough, then it will confirm there is an older version detected. If everything is okay you will be asked if you want upgrade now. Enter “Y” for yes.
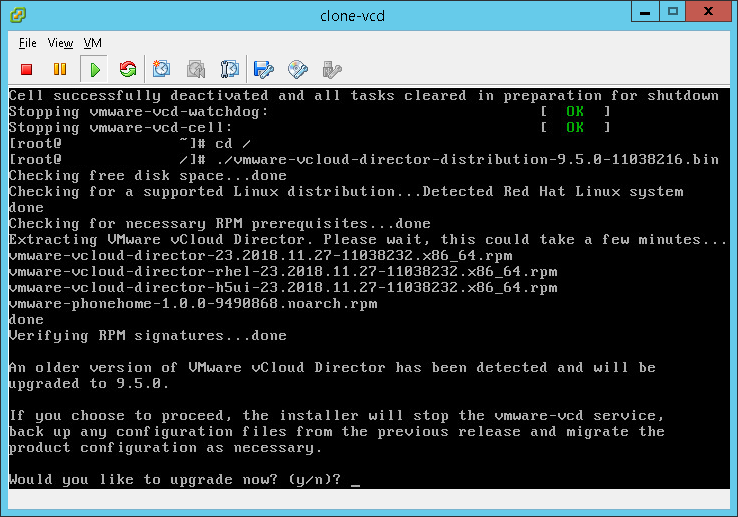
- The installation will now proceed, it should go pretty quickly.
- We now need to upgrade our VCD database to ensure it is at the correct version. Simply run:
/opt/vmware/vcloud-director/bin/upgrade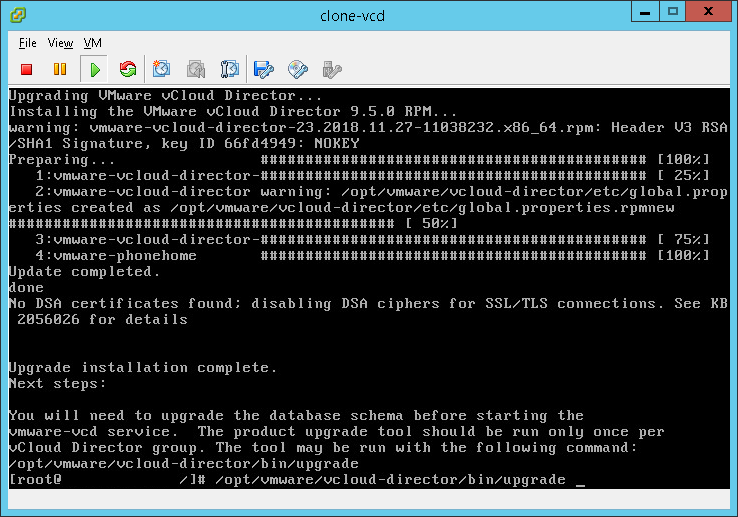
NOTE: This will connect to your database and make changes. It will also change any hosts that are currently ‘disabled’ in vCloud Director to enabled.
- You will be asked if you want to upgrade, enter “Y” for yes. If you get alerts read them and ensure there is no unknown issues.
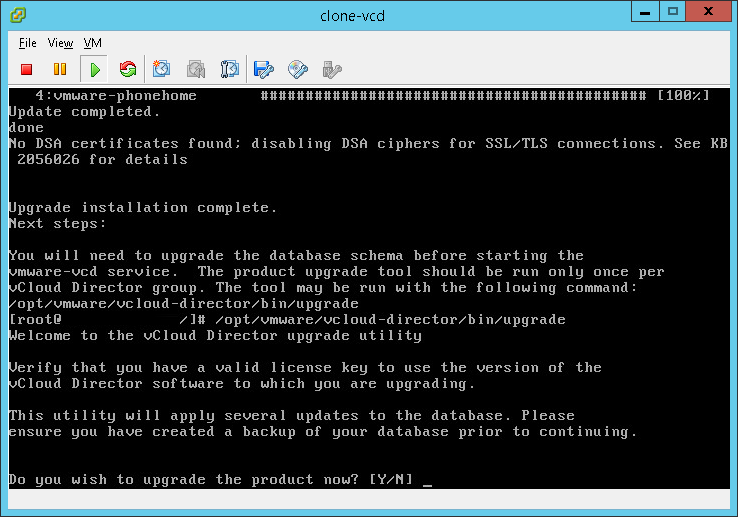
- Ensure you have created an offline backup of your database, once done enter “Y” for yes.
- If you want to start VCD services then enter “Y” to start the services now. Even if you are upgrading to vCenter 6.7 it is still recommended to start services now to ensure they are properly working.
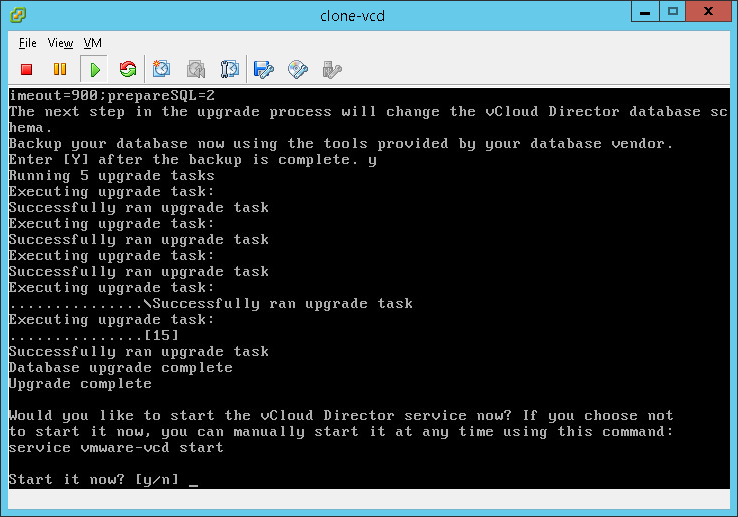
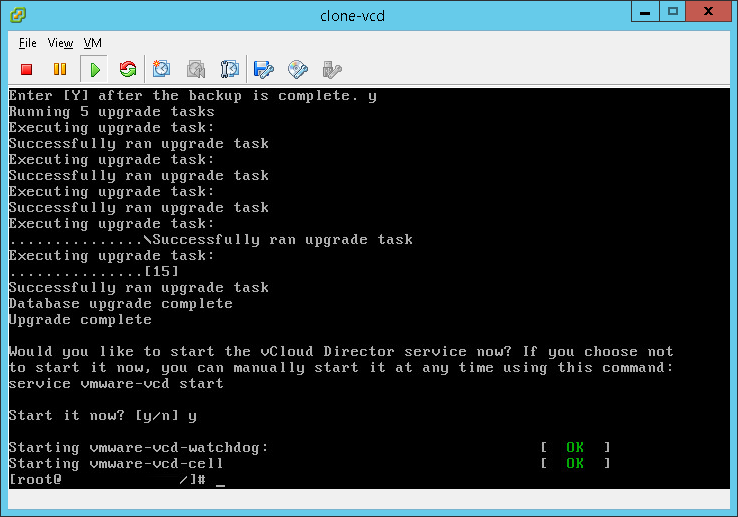
- Address any issues prior to moving to the next stage.
NOTE: Your existing vCloud Director license will more than likely not work on vCloud Director 9.5. Be sure to have your new license ready to be entered once the process is complete.
NOTE: To get the tenant to work we need to ensure that in public addresses that both HTTP and HTTPs are entered. This is located in Administration –> Public Addresses.
Upgrade NSX from 6.2.4 to 6.4.4
- Log into the NSX admin interface.
- Navigate to “upgrade”.
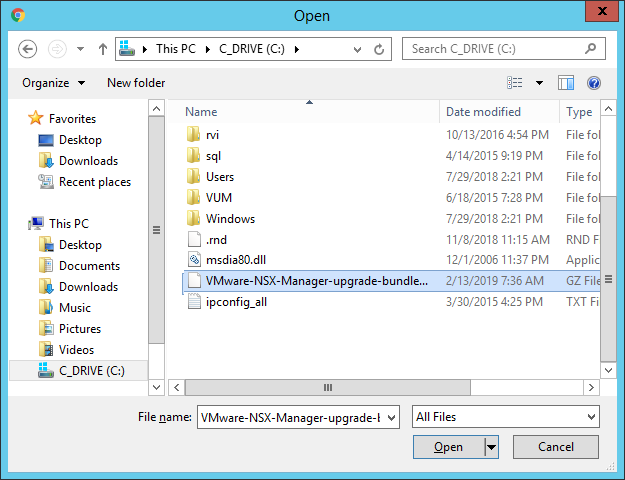
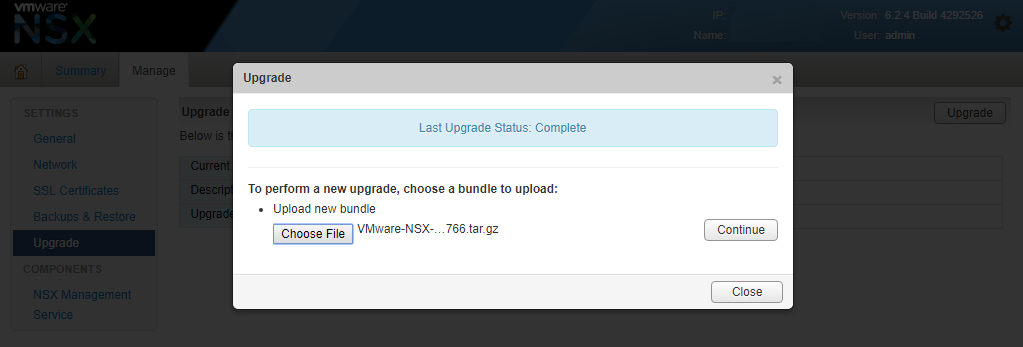
- Click on the “Upgrade” button and then “Choose file” and select the location where you saved “VMware-NSX-Manager-upgrade-bundle-6.4.4-11197766.tar.gz”
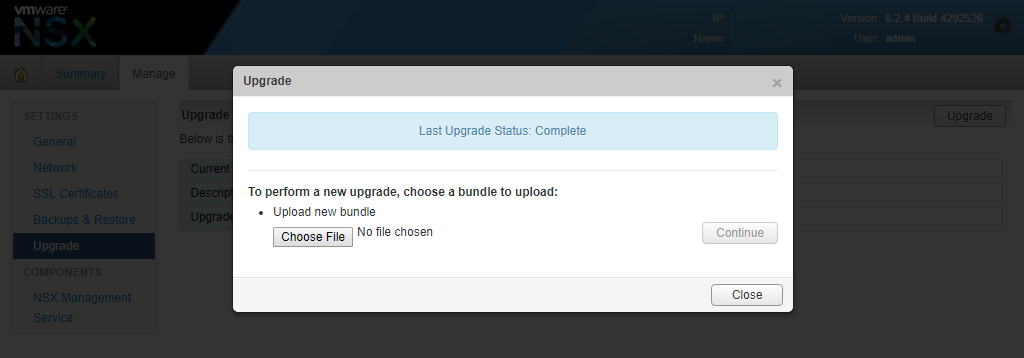
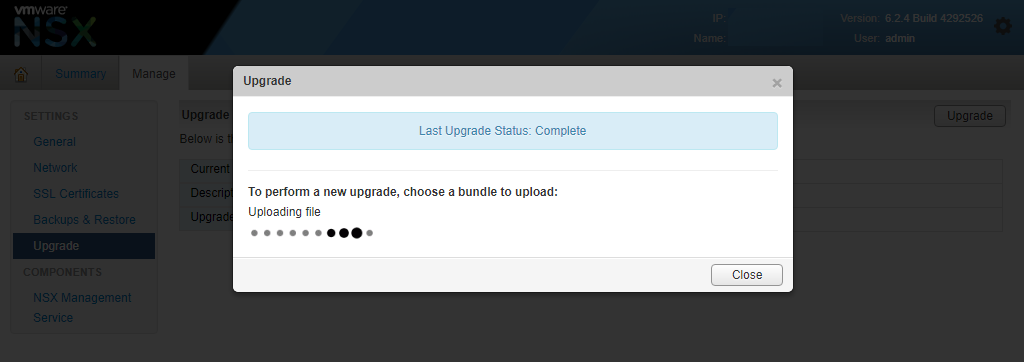
- Once attached click “Continue”.
- It will upload the file and analyze it.
- Once done determine if you want to enable or disable SSH and join the CEIP program, click “upgrade”.
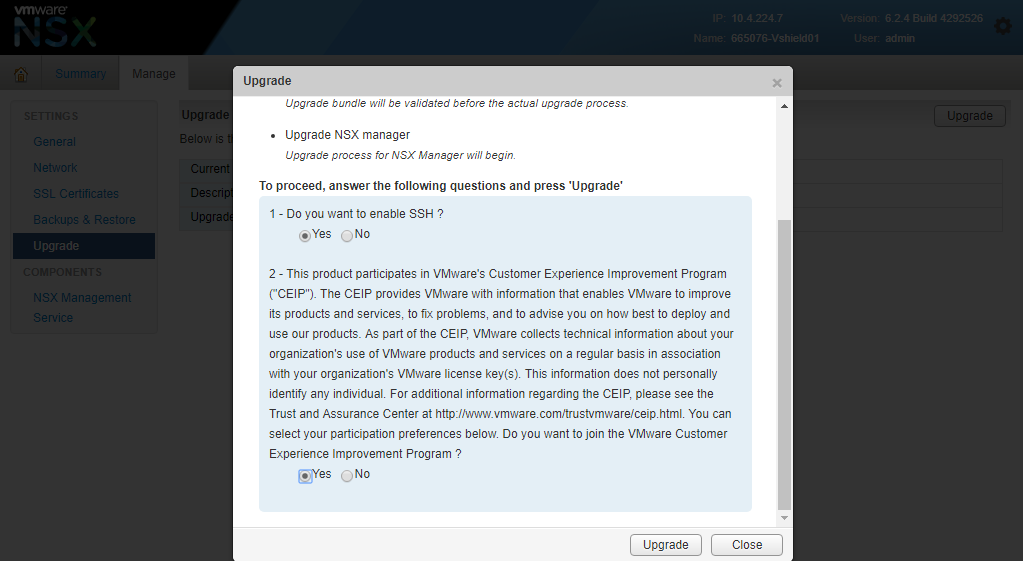
- Wait for the upgrade process to complete.
- When it is done it will say “Last Upgrade Status: Complete” and click on the “Continue” button.
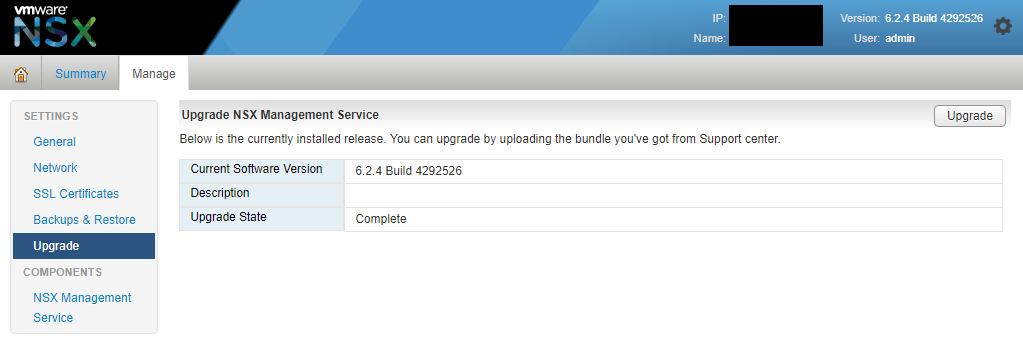
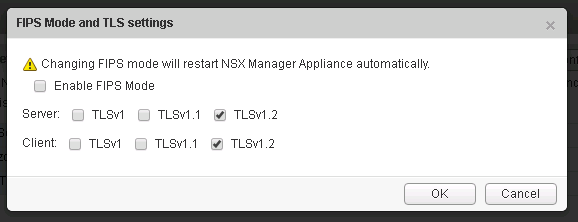
- Once the upgrade is complete click on the manage tab, under settings click the general link, and scroll down to “FIPS Mode and TLS settings” and click edit.

- Ensure that only TLS 1.2 is checked and click OK, the manager will immediately reboot once once OK is clicked.
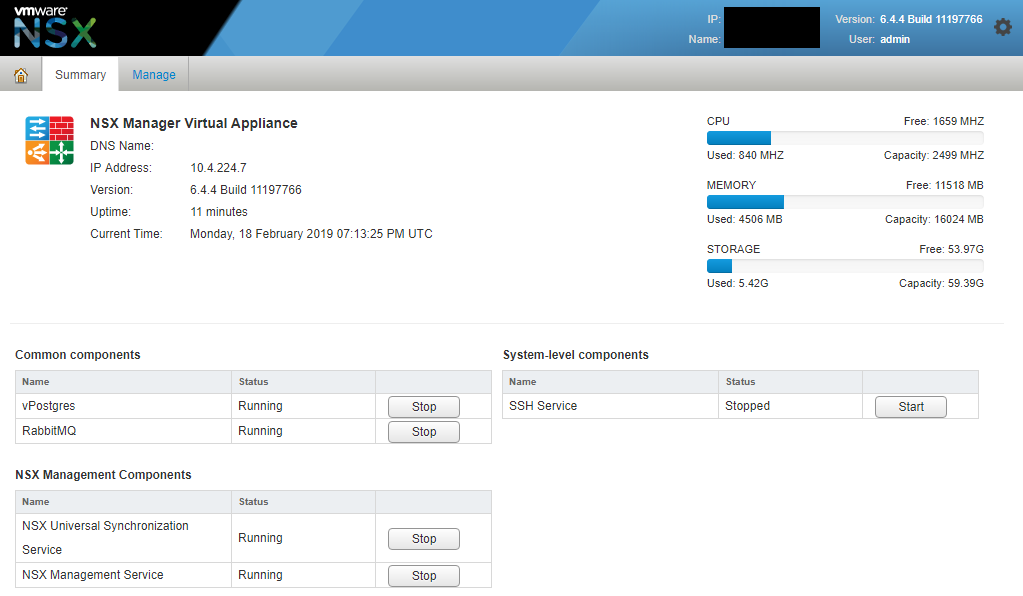
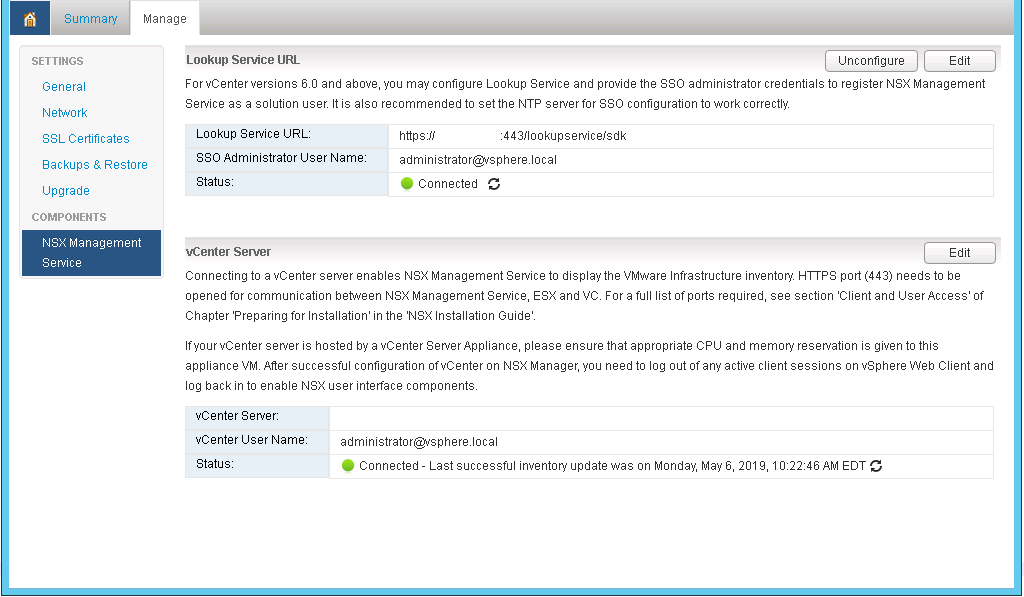
- After the appliance comes back online log back in, click on the manage tab, under components click the NSX Management Service link. Ensure that your Lookup Service URL and vCenter Server are showing connected.
- Once done upgrade your NSX controllers.
- After all controllers are upgraded you will also want to upgrade the NSX agent on all hypervisors.
vCenter Upgrade from 6.0 u3e to 6.7 Update 1b
NOTE: Name resolution is extremely critical when performing the upgrade. You will need to ensure whatever IP address you are currently using and the temporary IP address used on the new appliance will be able to contact the DNS servers
- FDQNs for your hypervisors and various VMware components will need to be located in the DNS server you are using. Failure to have full name resolution will typically result in the new appliance failing to start services after it has been deployed.
- The upgrade process is pretty good overall, however there are times when the installer might give a bad disk space estimate. For that I recommend presenting a temporary VMDK and mounting it within /var/tmp/cis-export-folder as I documented my article titled vCenter 6.7 upgrade space calculation error
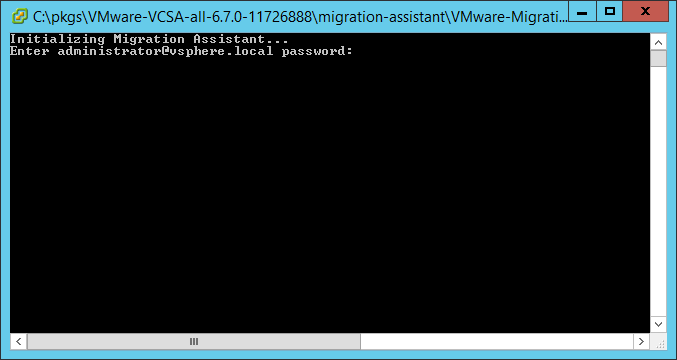
- Login as admin to the VUM machine.
- Extract “VMware-VCSA-all-6.7.0-11726888.iso” to a local disk or mount it as a CD drive.
- Navigate to DRIVE:\ExtractedDir\migration-assistant\ and start the program “VMware-Migration-Assistant”

- Enter the administrator@vsphere.local password when prompted.
- Allow the migration assistant to perform the analysis. Once it gets to “Waiting for migration to start…” you can proceed to the next step.
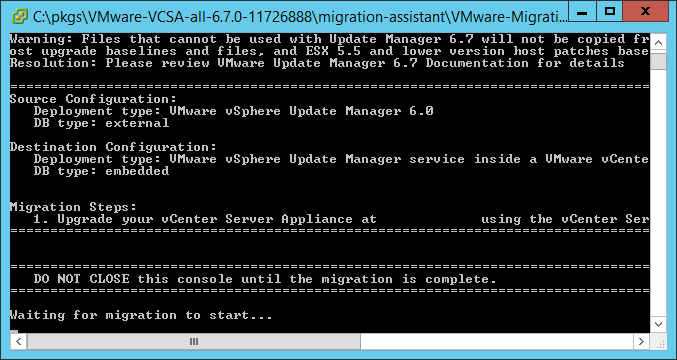
NOTE: Under “Migration Steps” ensure the IP address listed on line 1. matches the primary IP address you are expecting the VMware Update Manager to respond on. If it is not showing the correct IP then you might need to re-run the Update Manager Utility (located at C:\Program Files (x86)\VMware\Infrastructure\Update Manager\VMwareUpdateManagerUtility.exe) or you might have to reconfigure what IP address VUM is listening on within the vSphere Client.
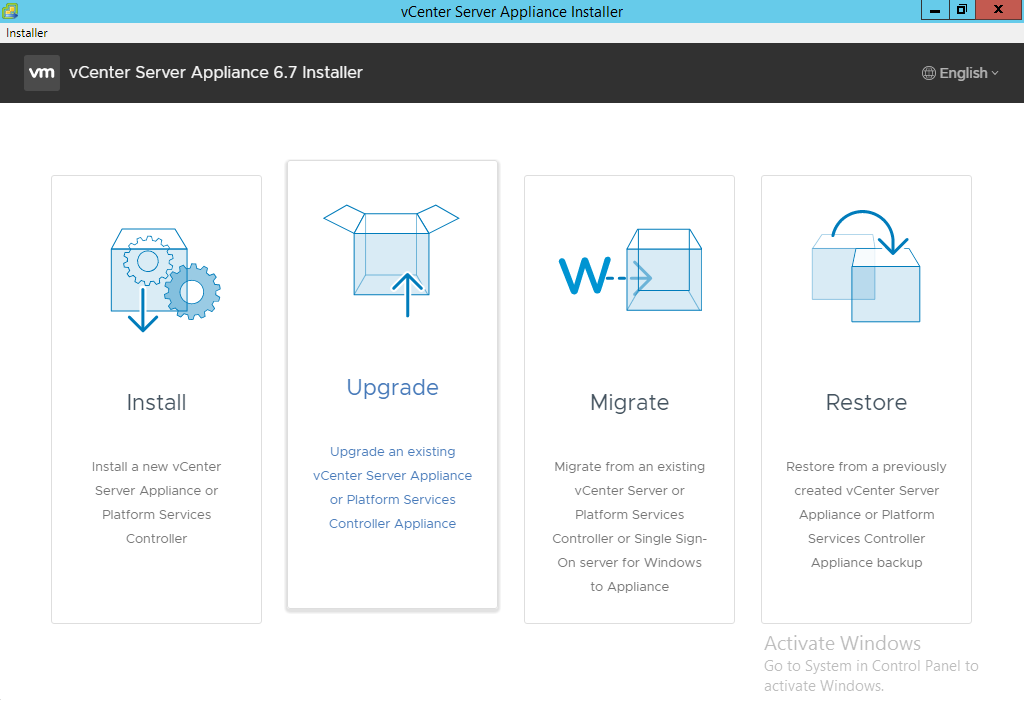
- Navigate to DRIVE:\ExtractedDir\vcsa-ui-installer\win32\installer.exe and start the program
- Click on “Upgrade”.
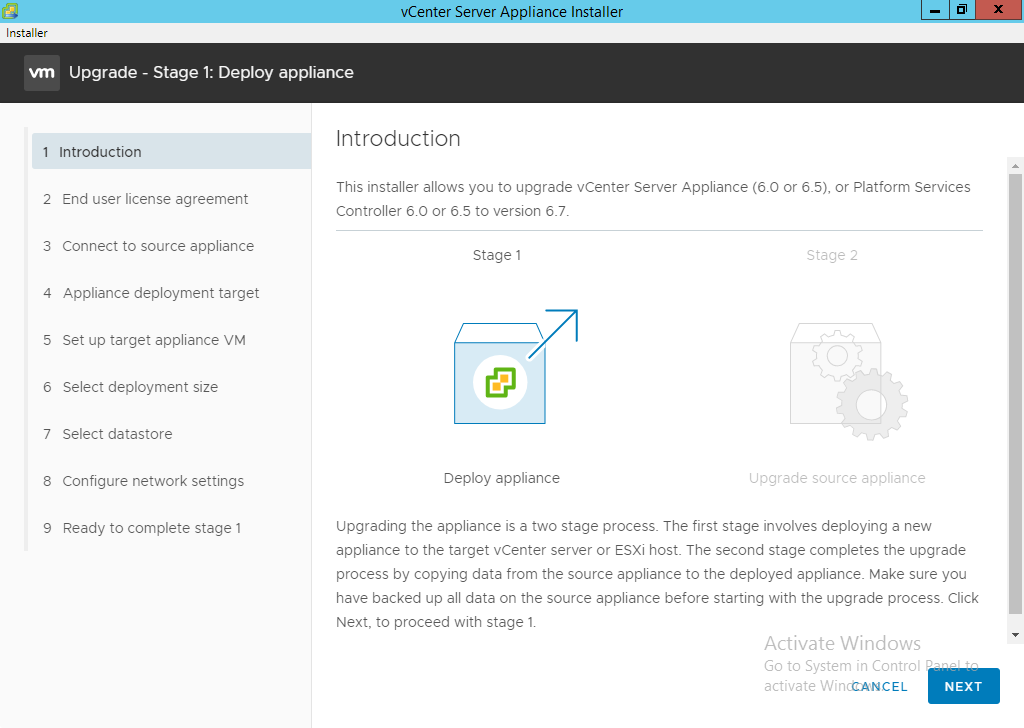
- On introduction click “Next”.
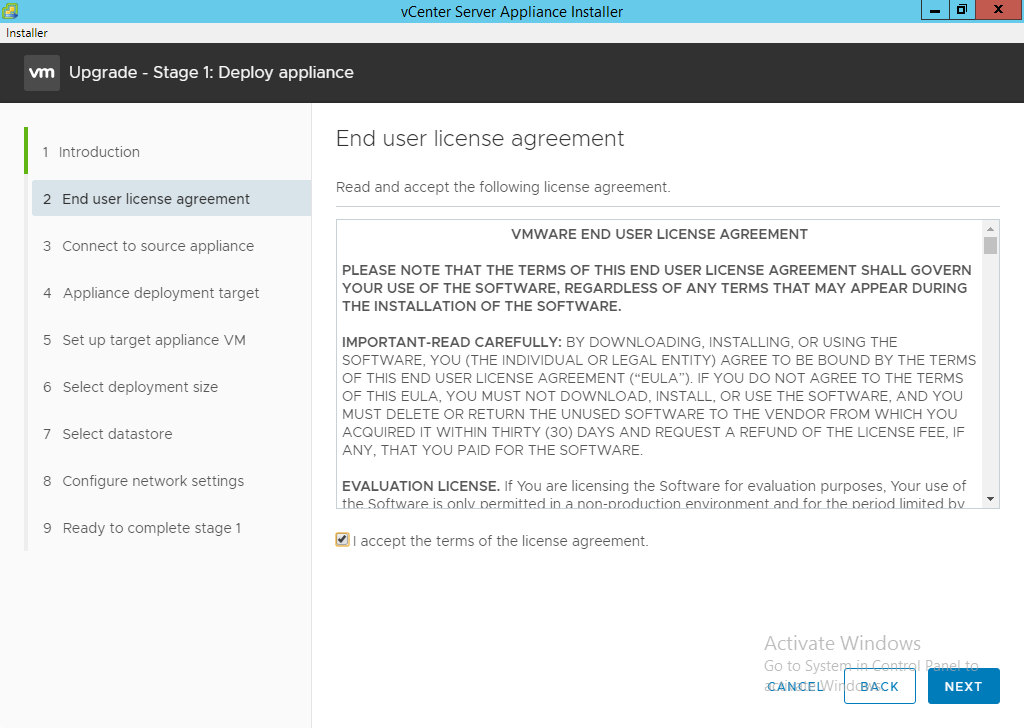
- Click “I accept the terms of the license agreement” and click “Next”.
- Enter the FQDN or IP address of the source vCenter and click “Connect to Source” followed by “Next”. This is the current machine that is running your existing vCenter services.

- Allow the connection to complete and analyze the system.
- You have to leave the SSO Username as administrator@vsphere.local and enter the appropriate passwords. For “SSO password” enter the password for administrator@vsphere.local for “Appliance (OS) root password” enter the password used to gain SSH access or access on port 5480 to the source appliance. These two passwords can be different, so be sure you have the right passwords.
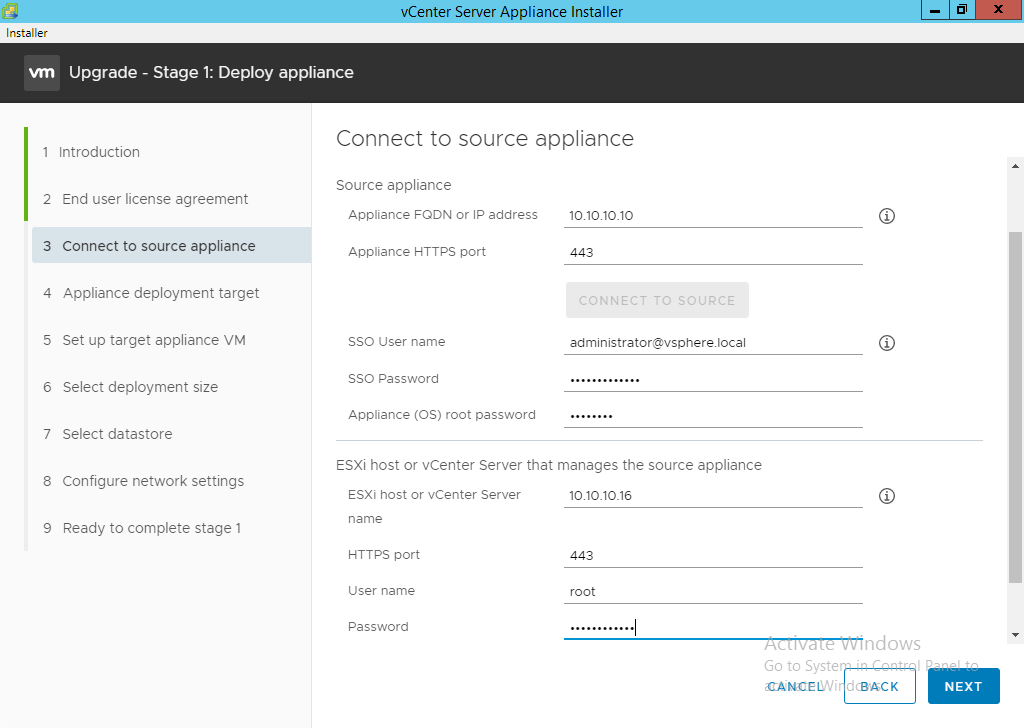
NOTE: If you have a password rotate policy now is a good time to pre-rotate the password of the original source appliance.
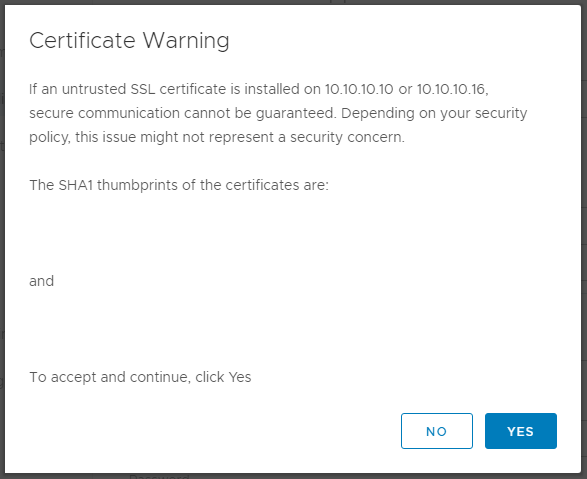
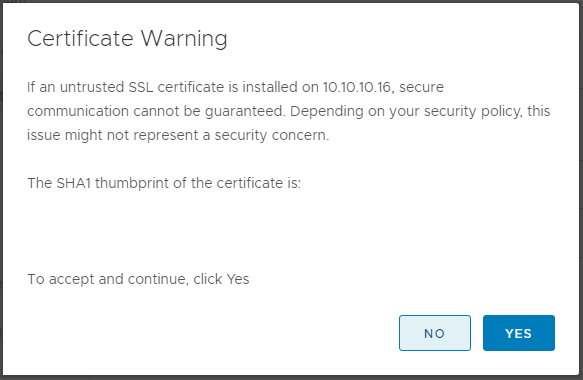
- Click “Yes” to accept the SSL certificate and allow the process to validated the information.
- Enter the ESXi host FDQN or IP address where the new vCenter appliance will be placed. Enter the password for that ESXi host and click “Next”. You can provide a separate vCenter Server instance if this is a nested vCenter appliance.
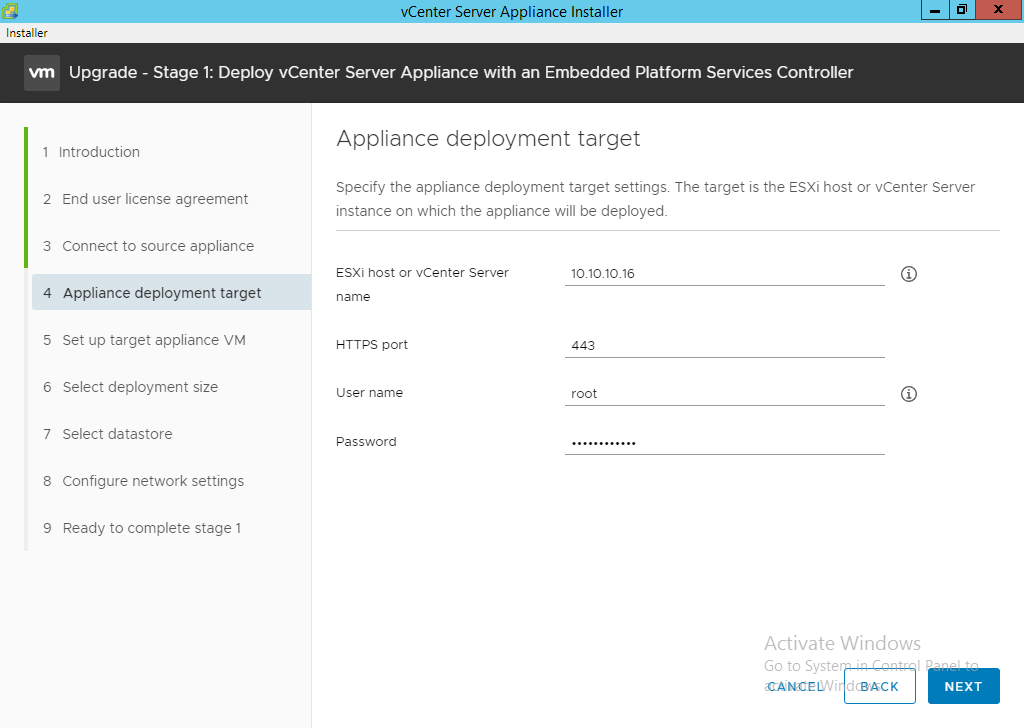
- Click “Yes” to accept the SSL certificate and allow the process to validated the information.
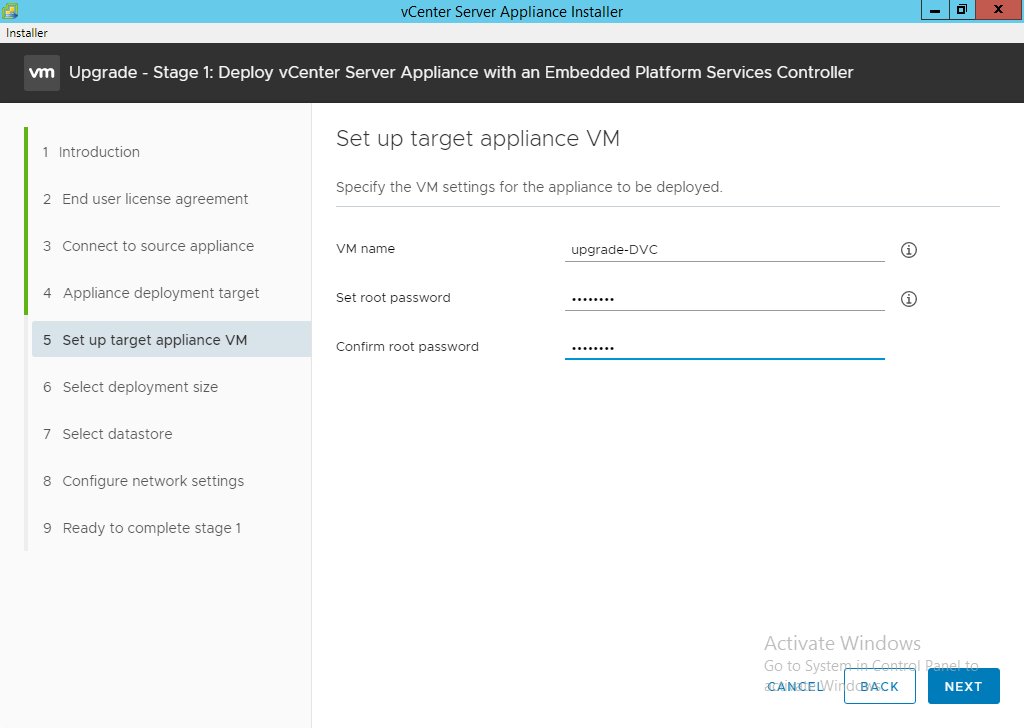
- Enter the name you want to call the new vCenter VM, this is the name as it appears in VM Inventory. Set the root password and click “Next”. It will analyze the current vCenter for a few seconds, there might be a pause before the next screen displays.
- Select the appropriate appliance size using the sizing information provided and click “Next”.
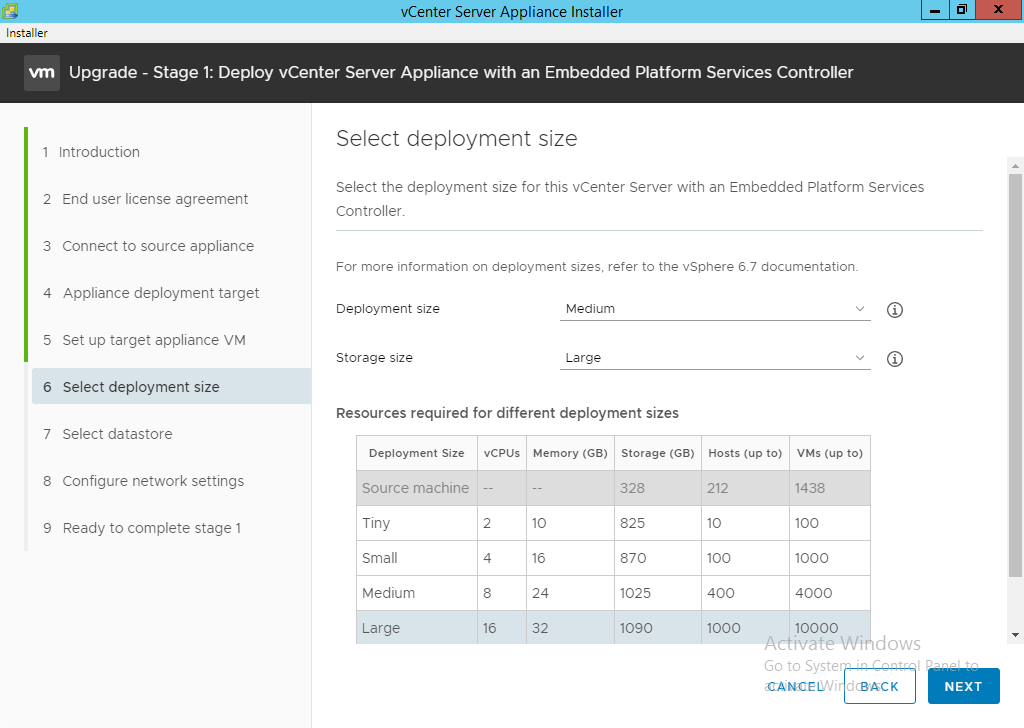
NOTE: The wizard will not let you under size the new appliance VM for either disk or CPU/RAM resources. If you do not have enough physical hardware then the wizard will alert you and you must upgrade hardware prior to completing the upgrade.
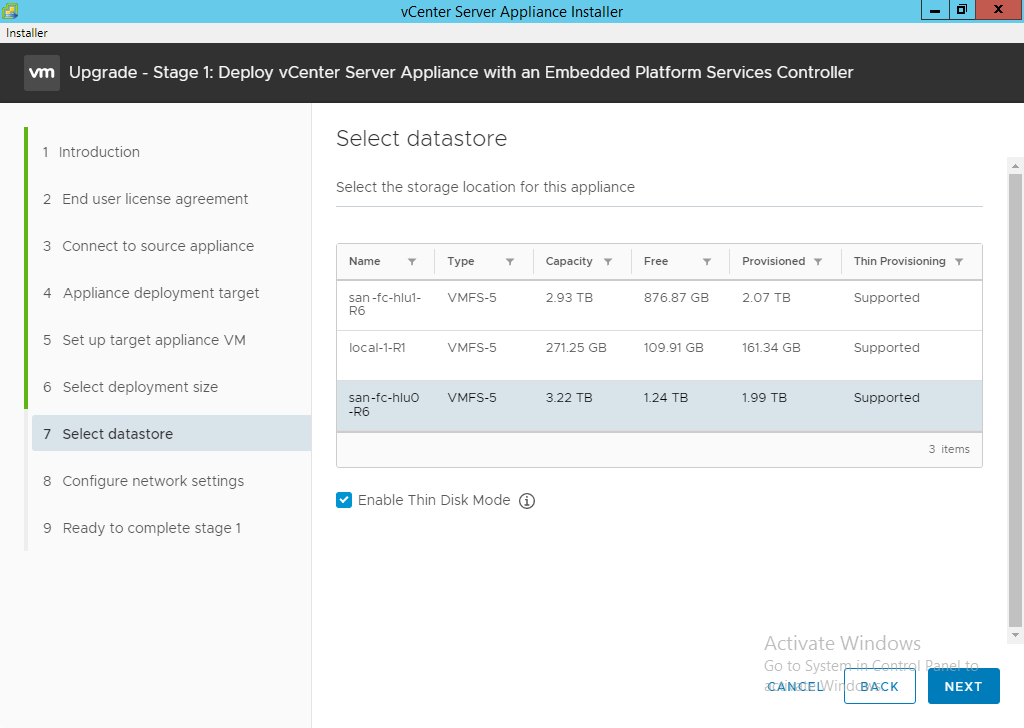
- Select the datastore where the new vCenter Appliance will be stored, select thin disk only if required, and click “Next”.
- Enter the network configuration information for the new vCenter Appliance and click “Next”.
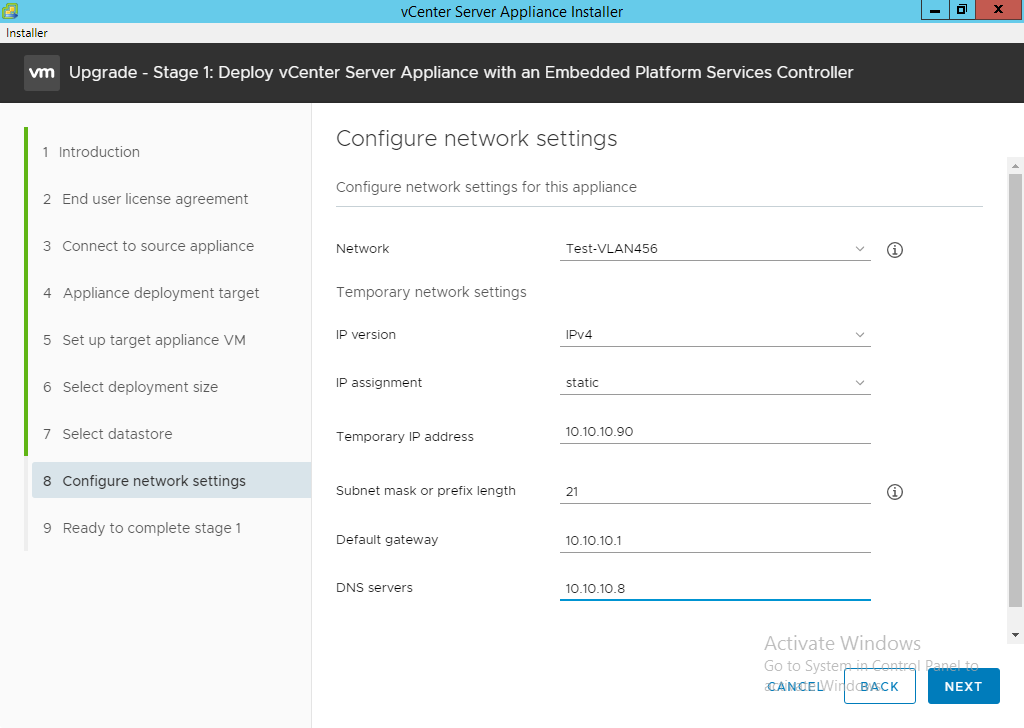
NOTE: The IP information entered is temporary. When the entire wizard completes successfully the new appliance will have the ORIGINAL IP addressed assigned to the old appliance. The temporary IP address will need to be able to connect to the original vCenter, VMware Update Manager Windows machine, and DNS servers.
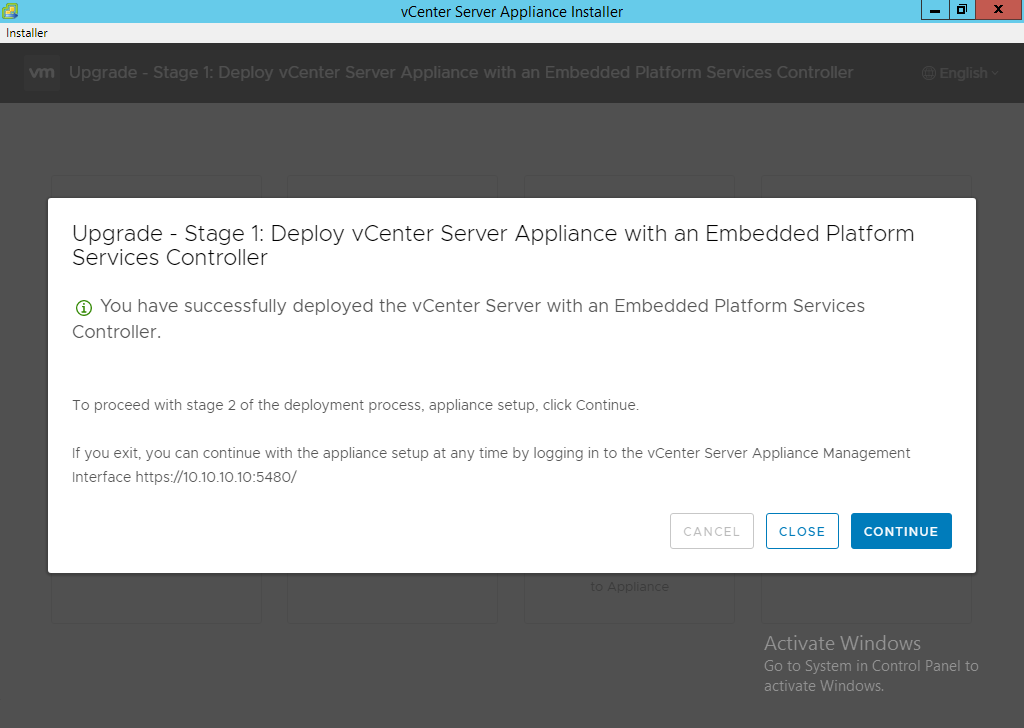
- Review the information and click “Finish” and allow the wizard to deploy the vCenter appliance.

NOTE: This simply deploys the new vCenter vApp VM, nothing is done with the source vCenter or VUM instance at this time.
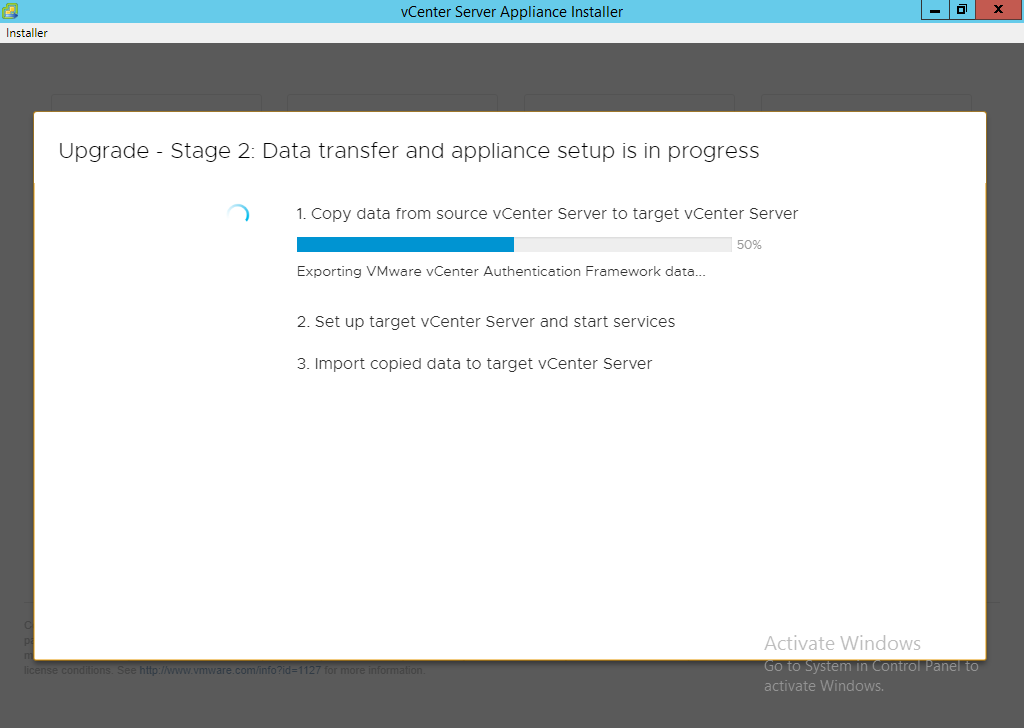
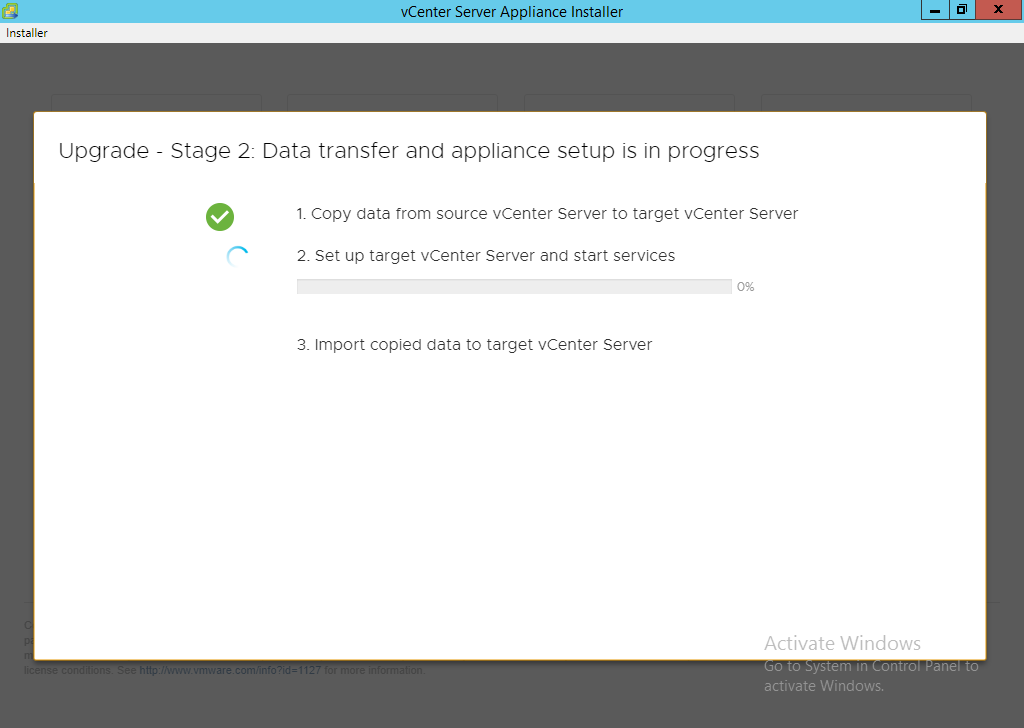
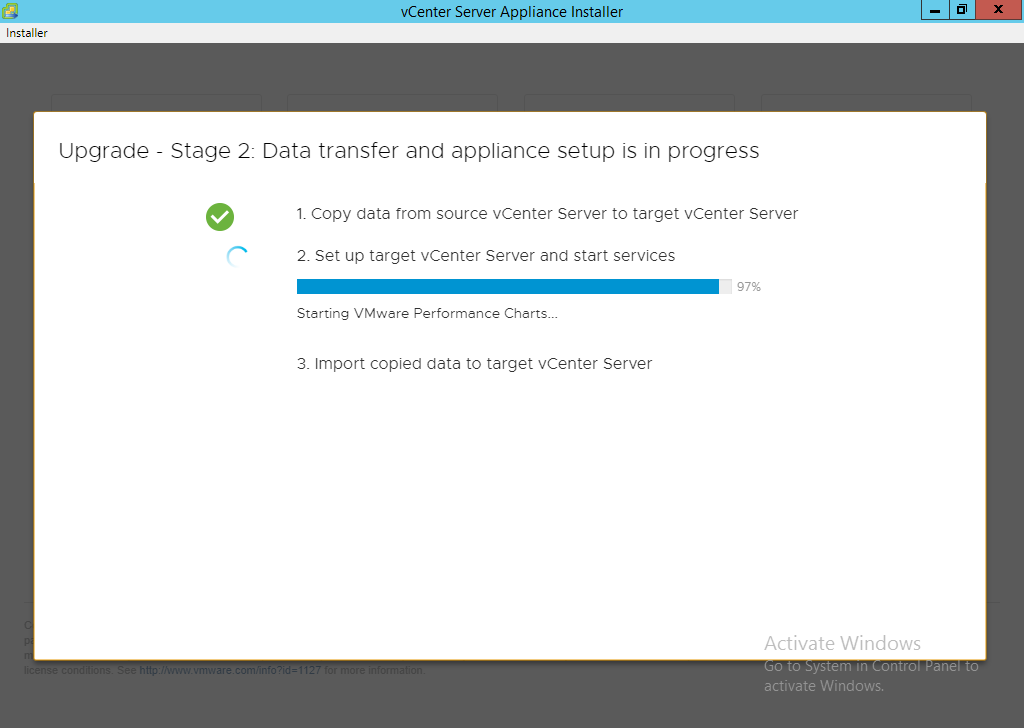
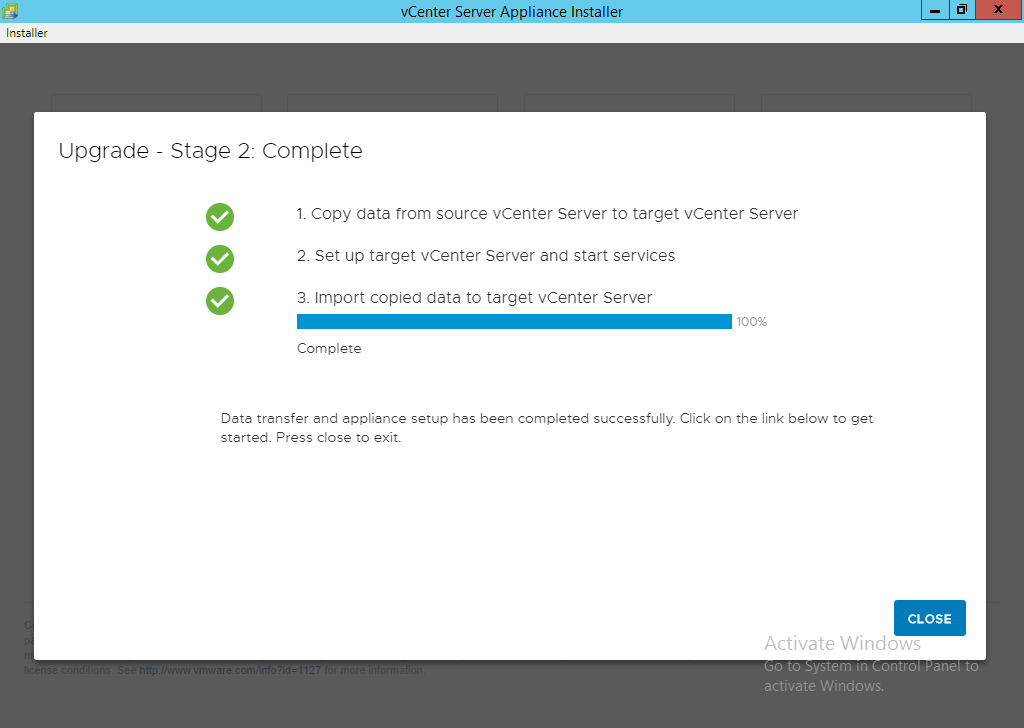
- After it has deployed click “Continue” to proceed with stage 2 of the deployment process.
- On introduction click “Next”.
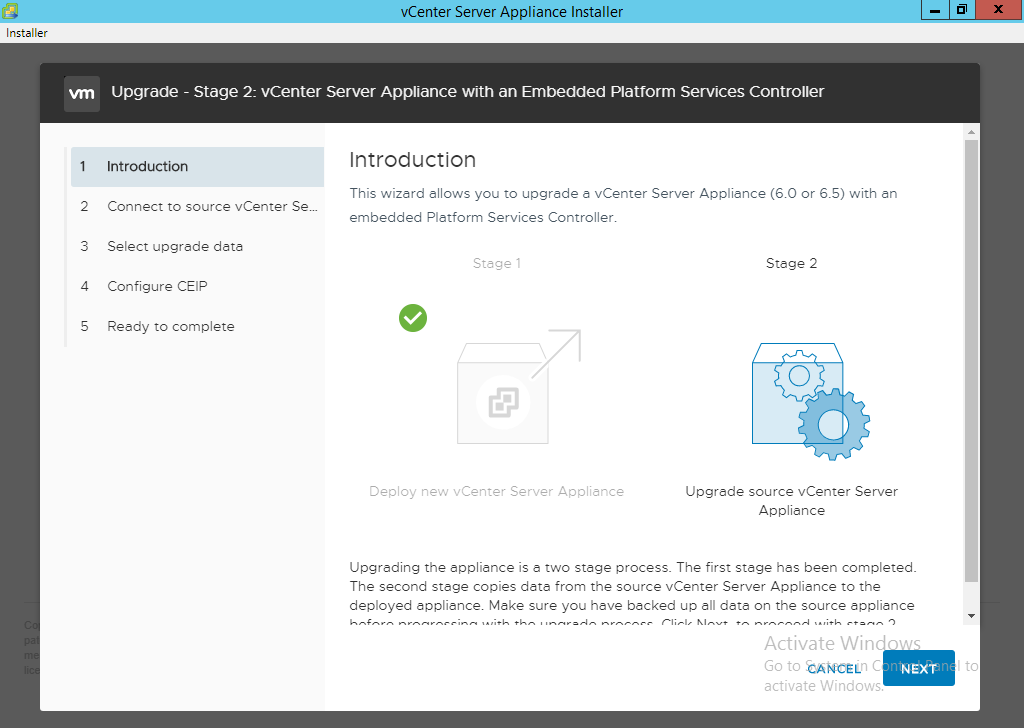
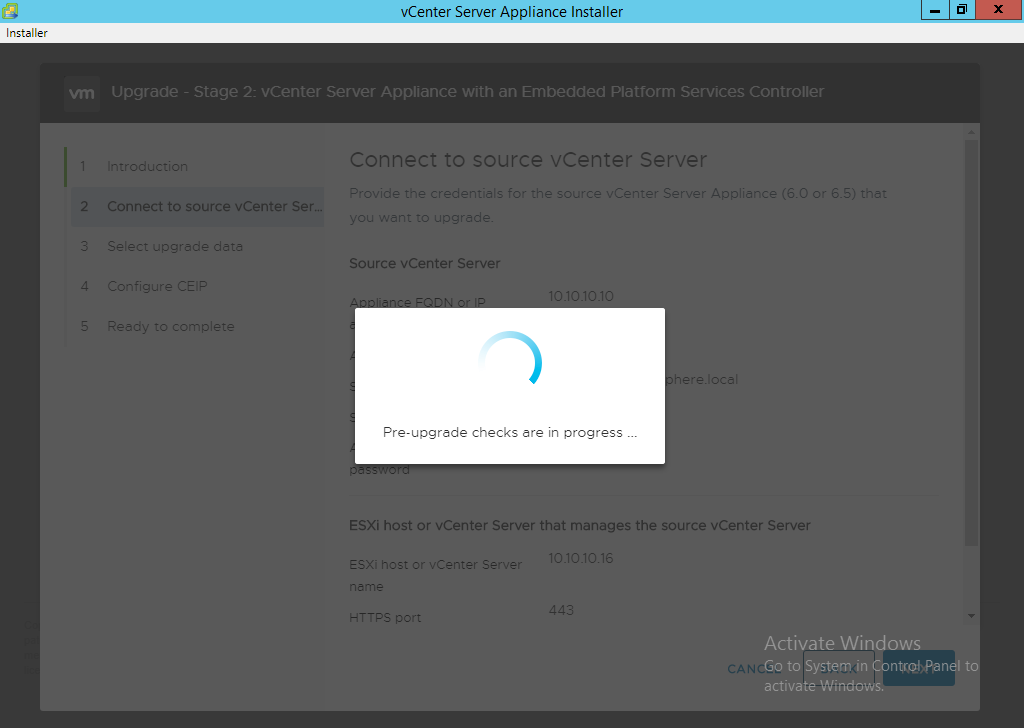
- On Connect to source vCenter Server click “Next” and allow the wizard to scan your environment. This process will take several minutes or longer to complete.
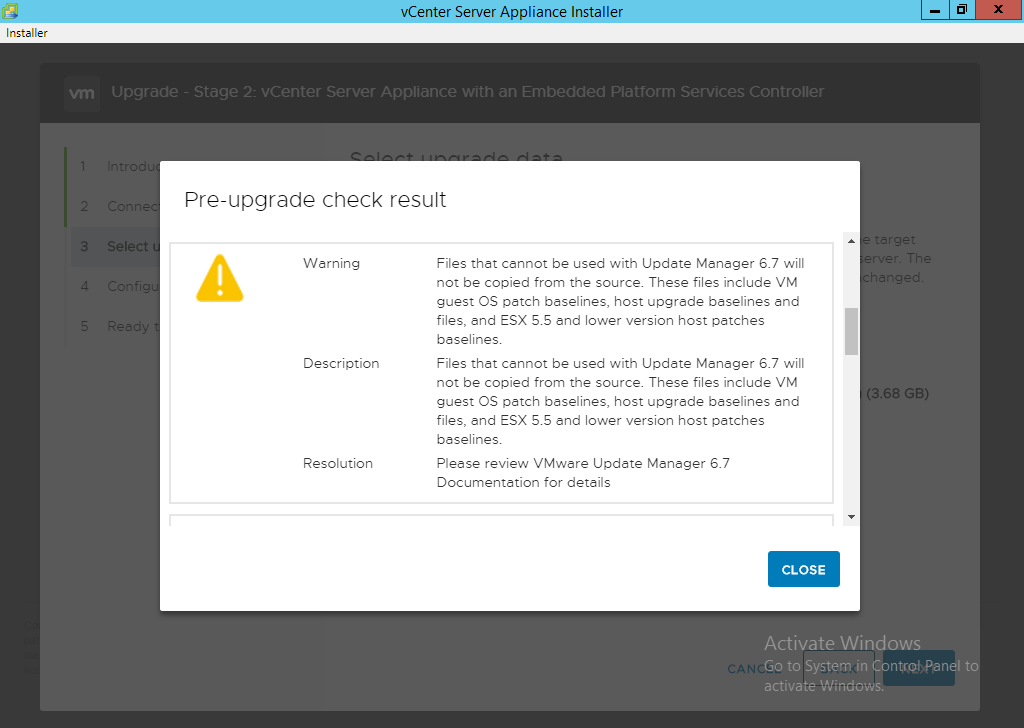
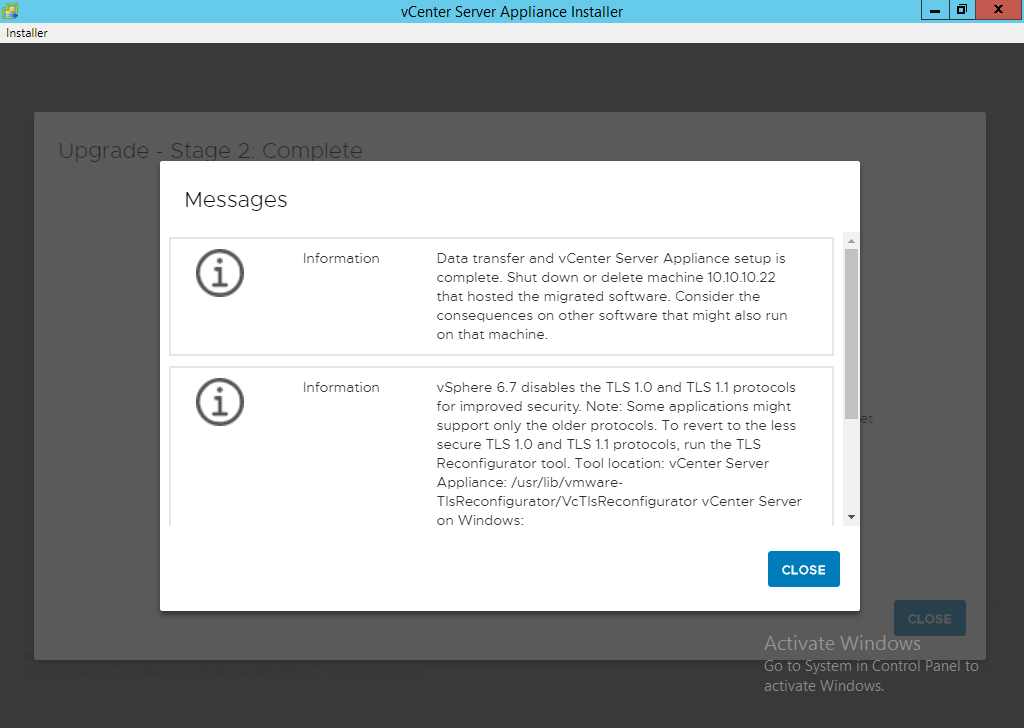
NOTE: There might be some information alerts, review these and ensure they will not impact your environment. If there are failures then they will be a red exclamation, you have to work through the errors and resolve them but do not close the wizard. Once done hit the back button and retry the process. If you do close out the wizard then use the IP address you gave the new appliance and browse it at https://IP.address:5480 to resume the upgrade process.
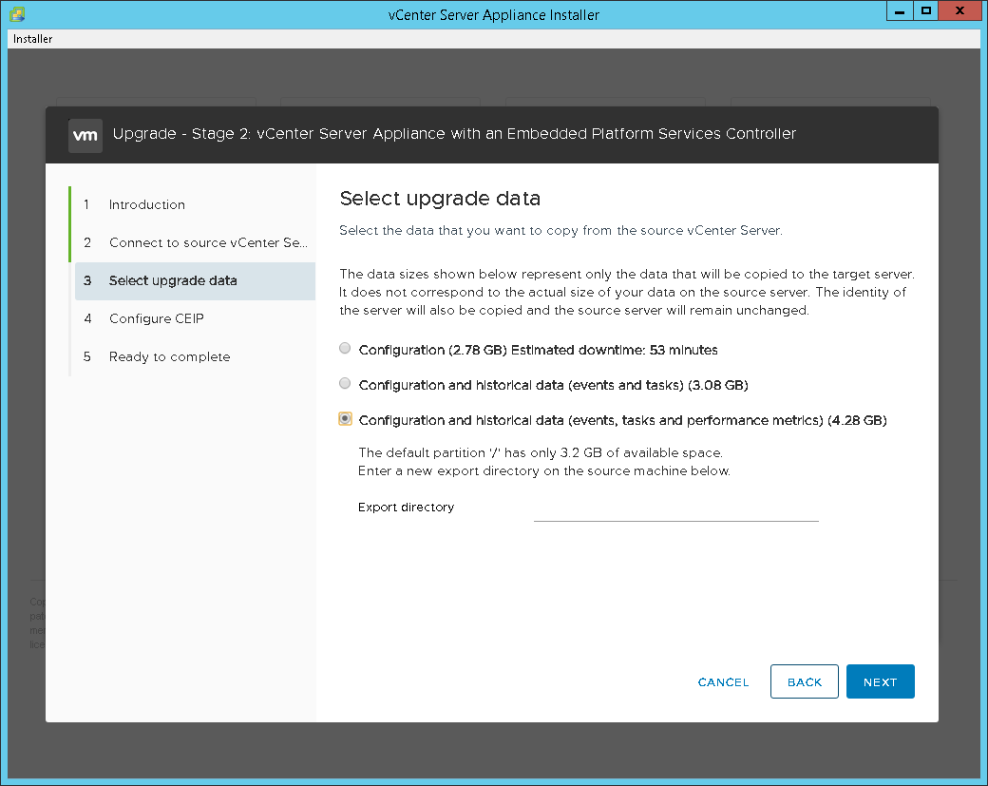
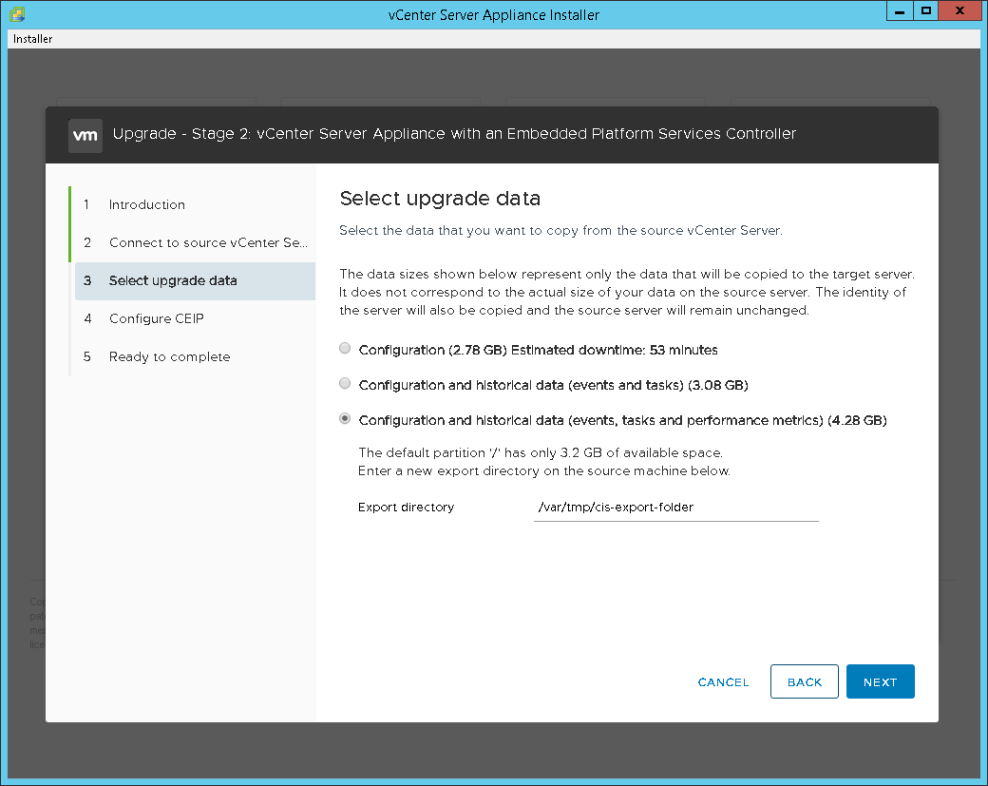
- Select the appropriate data migration type and click “Next”. See note below about migration data size requirements.
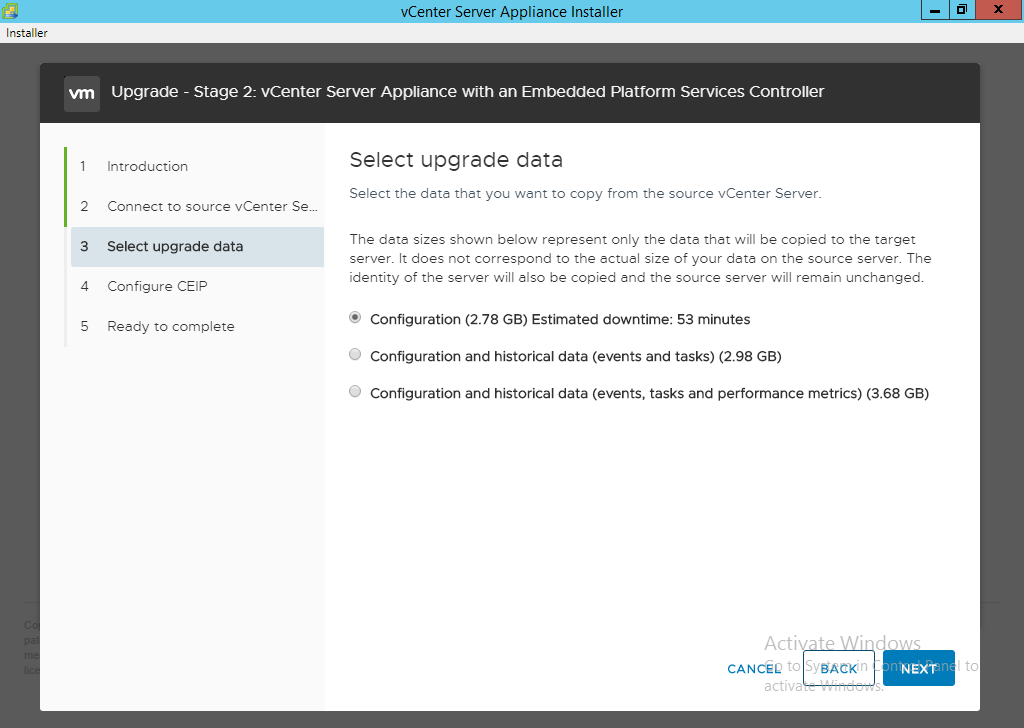
NOTE: If the data size is larger than the available freespace then you should be prompted with a dialog box for an export directory. If you are then be sure to enter the location we specified earlier, /var/tmp/cis-export-folde
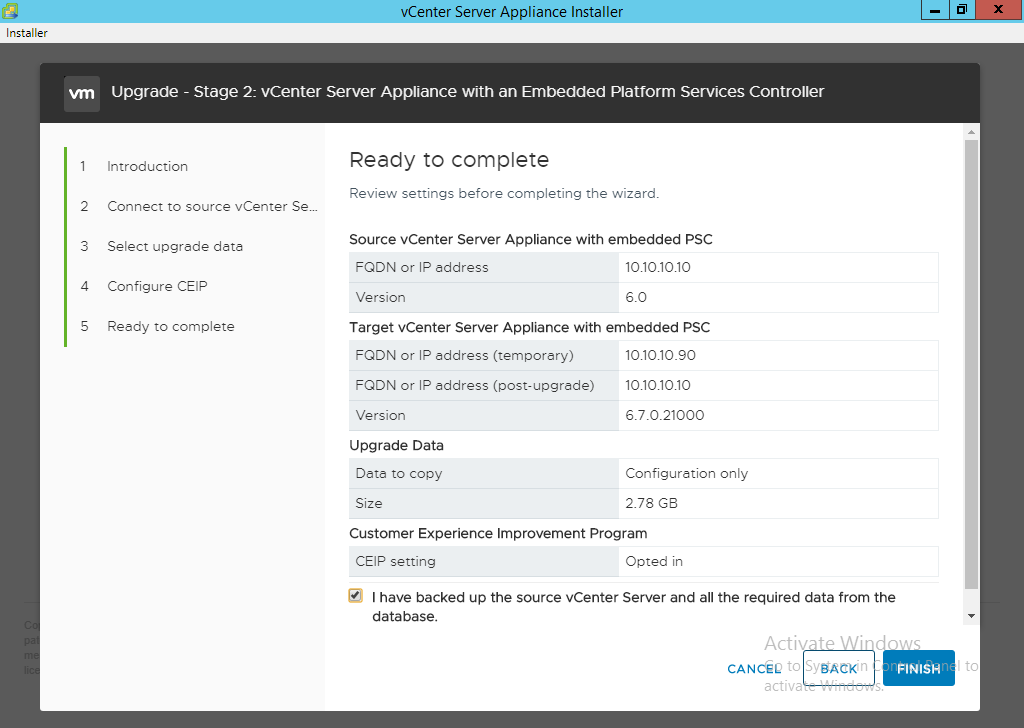
- Join the CEIP program. Failure to do so can cause support delays if you ever have to open a service request with VMware.

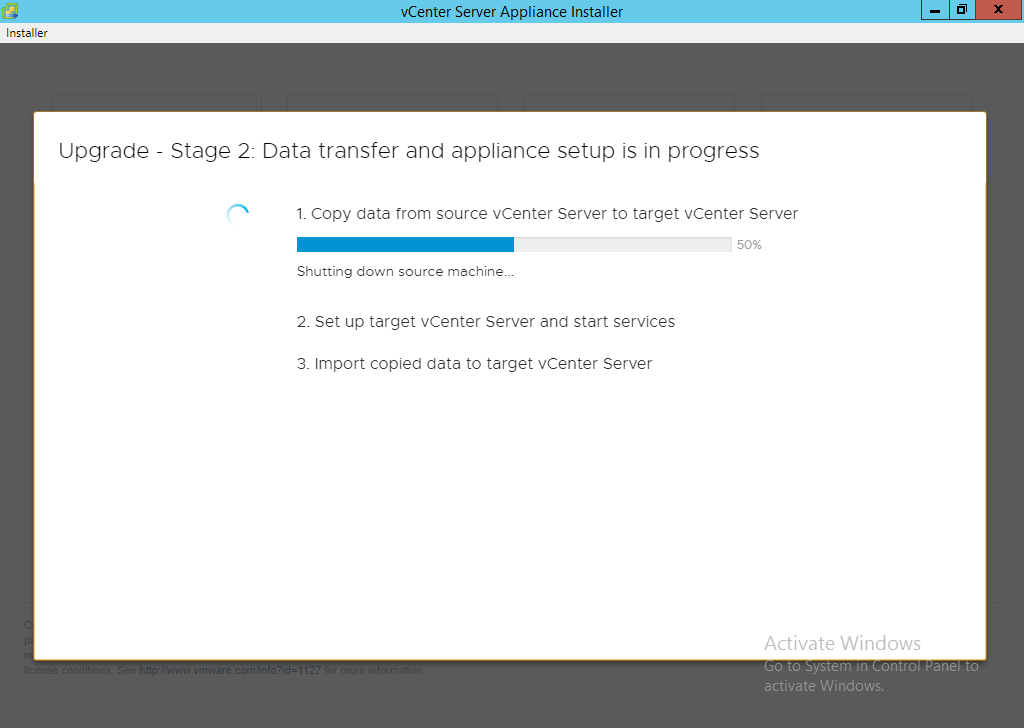
- Click the checkbox for “I have backed up the source vCenter Server….” and select “Finish”.
- Click OK on the Shutdown Warning dialog box to proceed.
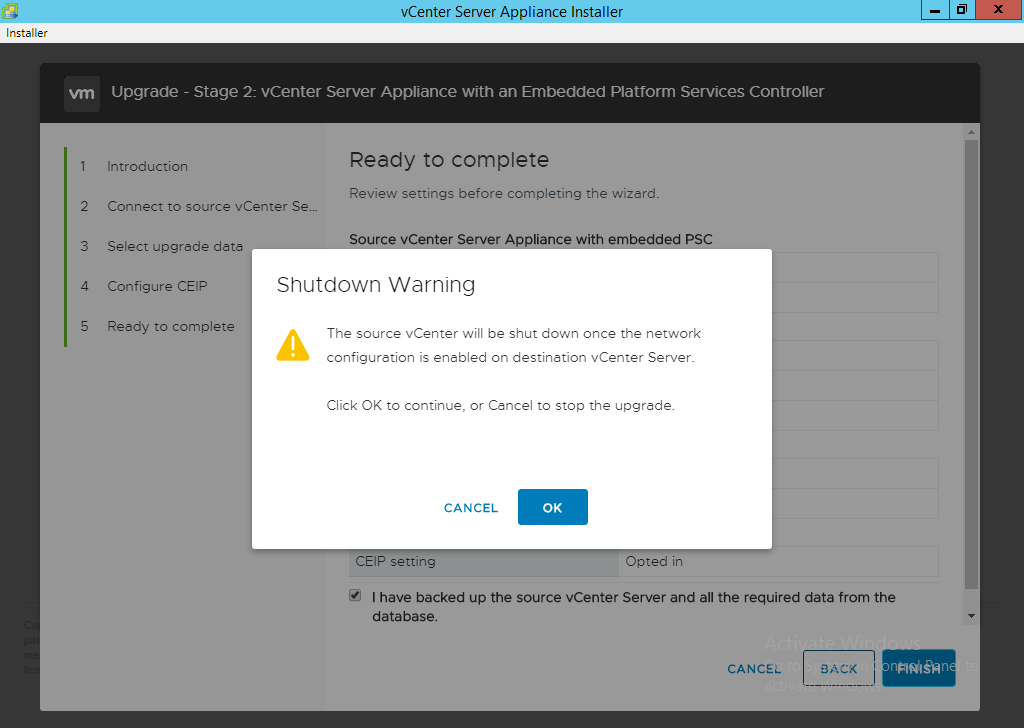 ALERT: From this point forward your source appliance should be considered offline to the end users. It will only come back online once the process is 100% complete.
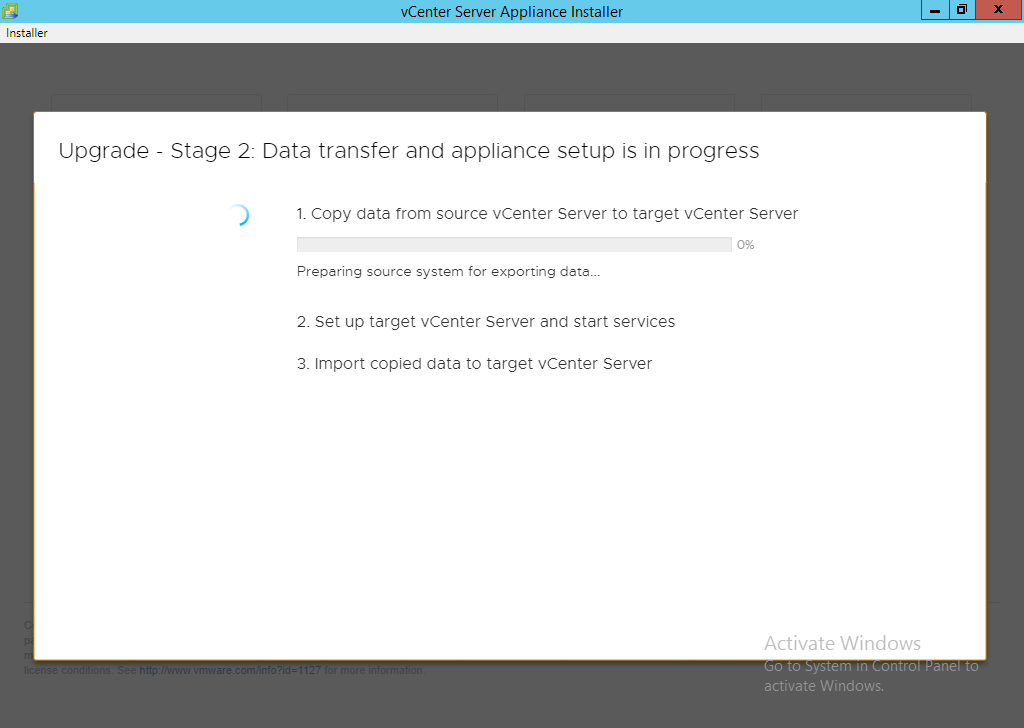
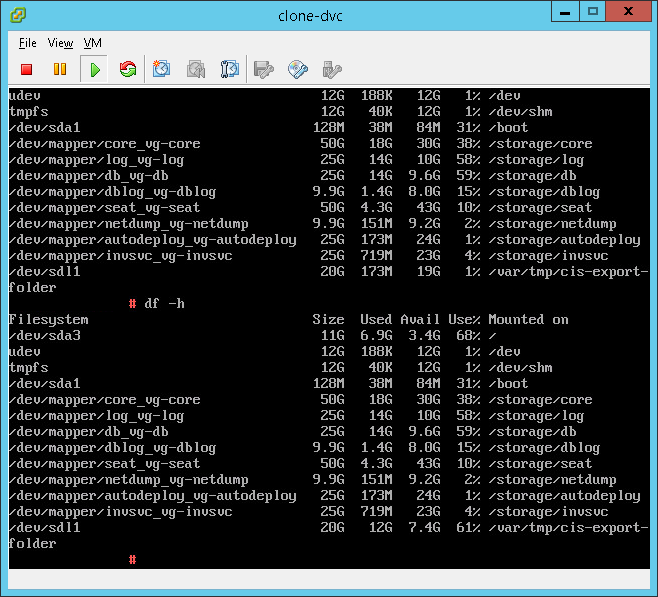
NOTE: If you get an error message for insufficient space then ensure you log into the source vCenter and clear up the required space. Running the command ‘df -h’ will tell you the mount points followed by ‘du -x -d1 -h’ can generally tell you where the problem is. You can also sort files via total file size by using ‘ls -Shal’. Areas to consider looking at are
- /var/log/audit
- /usr/lib/vmware-sca/wrapper/bin
- /storage/core
If the process fails and you have to restart the installer but it goes to a blank screen then there is something stuck in your user profile. You can retry via the vCenter URL which allows it to reload at https://IP.address:5480 Sometimes this tsill fails and you have to log in with a different user account on the Windows machine. If you have to restart the installer then check on space on the source appliance before restarting the process.
- If the vCenter is multi-homed then edit the settings of the new DVC device in either vCenter or on the ESXi host it is running on and add another VMXNet3 network adapter connected to port group needed.
NOTE: The new NIC should be immediately seen, however if NIC 1 is not showing then you will need to reboot the vCenter appliance for it to see it.
- Log into https://vCenterURL:5480
- Navigate to “Networking” and click “Edit” at the upper right.
- Expand NIC 1 and change to “Enter IPv4 Settings Manually” and enter the values, clicking save once done.
NOTES:
- IPv4 address prefix is the subnet but in the “slash” form, IE - /24 = 255.255.255.0.
- Sometimes the appliance likes to auto-add a gateway for a secondary NIC. Generally you cannot have two statically assigned gateways on a single machine, instead static routes should be used. If a second gateway gets added removing it in the GUI may not work, if you experience this then edit the file /etc/systemd/network/10-eth1.network and remove the gateway IP address line.
- Log into the new vAppliance and configure the static routes for the vCenter. These static routes add in two different ways.
- Edit the file /etc/systemd/network/10-eth1.network and add a new [Route] section. This is so the routes will be present after a reboot.
[Route] Gateway=172.16.24.1 Destination=172.16.25.0/24 Gateway=172.16.24.1 Destination=192.168.1.0/24 - Routes should be added with the following command for runtime static route, this will make an active route so a reboot is not required.
route add -net <TargetNetwork> netmask <NetmaskAddress> gw <GatewayAddress> dev <interface>Example:
 route add -net 172.16.25.0 netmask 255.255.255.0 gw 172.16.24.1 dev eth1
 route add -net 192.168.1.1 netmask 255.255.255.0 gw 172.16.24.1 dev eth1
- Edit the file /etc/systemd/network/10-eth1.network and add a new [Route] section. This is so the routes will be present after a reboot.
- Resolve/remove any old vCloud Director extension issue if it is still showing incorrectly in the vCenter: https://kb.vmware.com/s/article/2148881 or https://kb.vmware.com/s/article/1025360
NOTE: If NSX manager is offline when the vCenter comes online then the NSX plugin will not be enabled in the HTML5 client. In order for it to appear, power on the NSX manager and allow it to check into the vCenter, log into the vCenter appliance and restart the vsphere-ui. ‘service-control –restart vsphere-ui’