Synopsis
When upgrading NSX manager you might encounter an error for ‘large database table’ or ‘insufficient disk space’ or ‘database disk usage’. These errors can either be because the log directory in /common/logs is full or you actually have a valid database full problem.
Warning
If you do not understand these commands nor have experience with database work then I highly suggest creating an SR with VMware and letting them work with you.
Error outputs
Even though we receive two different errors the resolution for the errors is actually the same procedure.
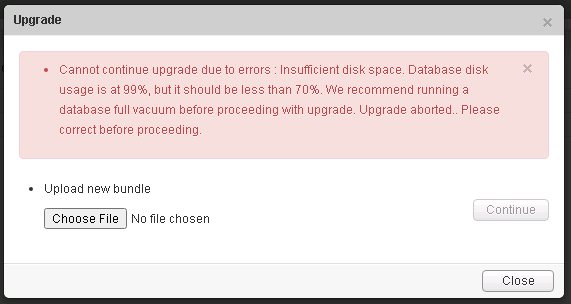
Error 1: Cannot continue upgrade due to errors : Insufficient disk space. Database disk usage is at 99%, but it should be less than 70%. We recommend running a database full vacuum before proceeding with upgrade. Upgrade aborted.. Please correct before proceeding.
Error 2: Cannot continue upgrade due to errors : Large database table. There are some tables with 5138984 entries, but the recommended table size is 5000000. We recommend running a database full vacuum before proceeding with upgrade. Upgrade aborted.. Please correct b
Create restore points
Whenever we work with the database and/or file system it is always recommended that we backup the NSX manager. There is two approved methods to do this:
1. Create a VAMI backup of the NSX manager.
1. Create a clone of the NSX Manager.
NOTE: Having a snapshot is not supported by VMware as a restore point.
Gaining root access
Getting into full root access on the NSX manager appliance is not an obvious process. We will want to SSH into the appliance which gets us initial access, from there we will need to switch to enable mode and finally get to engineering mode.
1. Log into the NSX manager appliance via SSH.
1. Switch to enable mode by typing:
“`
enable
“`
1. Enter the password, which by default is ‘default’
“`
default
“`
1. Enter into engineering mode
“`
st eng
“`
1. You will be asked if you are willing to accept responsibility, enter ‘Y’ and then enter the password.
“`
IAmOnThePhoneWithTechSupport
“`
Confirming Disk Space
1. Examine the space left on the file system by executing ‘df -h’
“`
[root@nsx-01 /]# df -h
Filesystem Size Used Avail Use% Mounted on
/dev/root 5.6G 2.1G 3.2G 40% /
devtmpfs 7.9G 0 7.9G 0% /dev
tmpfs 7.9G 460K 7.9G 1% /run
/dev/sda6 44G 42G 371M 100% /common
“`
1. Confirm where the disk space is being consumed in /common by running ‘du -h’
“`
[root@nsx-01 /]# du -h /common/
16K /common/lost+found
16K /common/lost+found
4.0K /common/dumps
4.0K /common/em/components/sem
1.9G /common/em/components/vdn
4.0K /common/em/components/xml
4.0K /common/em/components/vdb
19M /common/em/components/offline-bundles
368M /common/em/components/usvm
153M /common/em/components/edge
76M /common/em/components/epsec
509M /common/em/components/image
8.0K /common/em/components/metadata
3.0G /common/em/components
163M /common/em/downloads/edge/trinity
163M /common/em/downloads/edge
567M /common/em/downloads/image
76M /common/em/downloads/epsec
9.4M /common/em/downloads/offline-bundles
1.1G /common/em/downloads/vdn
389M /common/em/downloads/usvm
12K /common/em/downloads/snmp
8.0K /common/em/downloads/metadata
2.3G /common/em/downloads
28K /common/em/upgrade/logs
36K /common/em/upgrade
18M /common/em/backup
5.3G /common/em
128K /common/tmp
16K /common/auto
116K /common/work
4.0K /common/logs
4.0K /common/etc
8.0K /common/kernel_core
80K /common/configs
8.0K /common/secureall
36K /common/images
4.0K /common/db/vshield/pg_xlog/archive_status
81M /common/db/vshield/pg_xlog
508K /common/db/vshield/global
33M /common/db/vshield/pg_clog
4.0K /common/db/vshield/pg_commit_ts
4.0K /common/db/vshield/pg_dynshmem
12K /common/db/vshield/pg_notify
4.0K /common/db/vshield/pg_serial
4.0K /common/db/vshield/pg_snapshots
112K /common/db/vshield/pg_subtrans
4.0K /common/db/vshield/pg_twophase
1.9M /common/db/vshield/pg_multixact/members
744K /common/db/vshield/pg_multixact/offsets
2.6M /common/db/vshield/pg_multixact
7.0M /common/db/vshield/base/1
7.0M /common/db/vshield/base/12451
7.0M /common/db/vshield/base/12452
36G /common/db/vshield/base/16384
4.0K /common/db/vshield/base/pgsql_tmp
36G /common/db/vshield/base
4.0K /common/db/vshield/pg_replslot
4.0K /common/db/vshield/pg_tblspc
4.0K /common/db/vshield/pg_stat
440K /common/db/vshield/pg_stat_tmp
4.0K /common/db/vshield/pg_logical/snapshots
4.0K /common/db/vshield/pg_logical/mappings
12K /common/db/vshield/pg_logical
36G /common/db/vshield
452K /common/db/monitor/PG_9.6_201608131/16384
456K /common/db/monitor/PG_9.6_201608131
460K /common/db/monitor
12K /common/db/snmp
36G /common/db
12K /common/vsmvam/configs
24K /common/vsmvam
12K /common/replicator/configs
24K /common/replicator
3.2M /common/rabbitmq
42G /common/
“`
1. Alternatively the disk space could be showing fine but you still could be getting the second error from above and there is plenty of disk space.
“`
[root@nsx-01 /]# df -h
Filesystem Size Used Avail Use% Mounted on
/dev/root 5.6G 2.4G 3.0G 45% /
devtmpfs 7.9G 0 7.9G 0% /dev
tmpfs 7.9G 456K 7.9G 1% /run
/dev/sda6 44G 21G 21G 50% /common
“`
1. An alternative command you can run that will find files larger than 1MB would be:
“`
find / -xedv -type f -size +1M -exec ls -lh {} ; 2> /dev/null | awk ‘{ print $NF “: ” $5 }’ | sort -n -k2 -r
“`
Fixing the underlying issues
1. Confirm the status of the NSX manager services.
“`
/etc/rc.d/init.d/bluelane-manager status
Output:
STARTED
“`
1. Now we will want to stop the NSX Manager service. This process will take a few seconds.
“`
/etc/rc.d/init.d/bluelane-manager stop
Output:
Stopping VMware NSX Enterprise Manager…
VMware NSX Enterprise Manager stopped.
“`
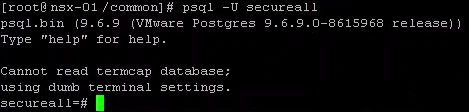
1. Access postgres to manipulate the database, this should get you into the ’secureall’ prompt.
“`
psql -U secureall
“`
1. Let’s enable expanded display.
“`
x
“`
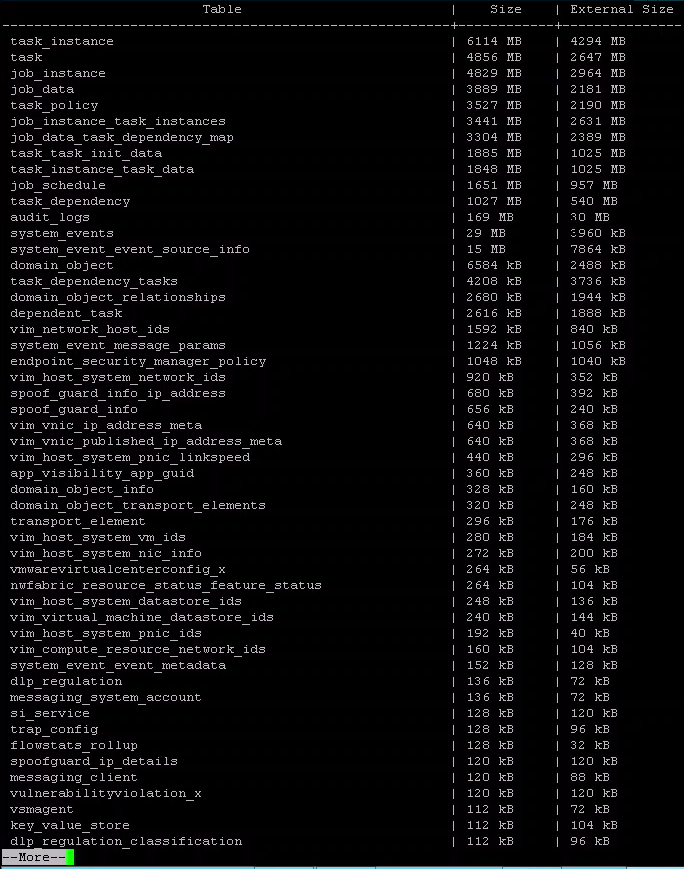
1. Now we will execute a command that will display our page sizes in our database, ordered by the total relation size. Because of how FlatPress works, I am having to break up this line.
“`
select relname as “Table”, pg_size_pretty(pg_total_relation_size(relid)) As “Size”, pg_size_pretty(pg_total_relation_size(relid) - pg_relation_size(relid)) as “External Size” from pg_catalo
g.pg_statio_user_tables ORDER BY pg_total_relation_size(relid) DESC;
“`
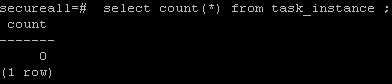
1. For Error 2 above we need to get a count from task_instance.
“`
select count(*) from task_instance ;
Output:
-[ RECORD 1 ]–
count | 5181456
“`

1. We will now want to vacuum the tables that we know from VMware are safe to do so on. NOTE: Do NOT vacuum anything unless you are for certain if it can safely be cleaned up.
“`
TRUNCATE TABLE job_instance_task_instances, ta sk_instance_task_data,task_instance_task_output,task_instance,task_task_init_data,task ,task_policy ,task_target, job_instance_job_output, job_instance, job_data_task_dependency_map, task_dependency_tasks,dependent_task,job_data,job_schedule,task_dependency,housekeeping_module;
Output:
TRUNCATE TABLE
“`

1. For Error 2 above we need confirm the count for task_instance has decreased.
 select count(*) from task_instance ;
 Output:
 count
 —–
 0
1. Now we need to quit out of the secureall prompt
“`
q
“`
1. Now lets look at the disk space and see if we have recovered enough.
“`
[root@nsx-01 /]# df -h
Filesystem Size Used Avail Use% Mounted on
/dev/root 5.6G 2.0G 3.4G 38% /
devtmpfs 7.9G 0 7.9G 0% /dev
tmpfs 7.9G 448K 7.9G 1% /run
/dev/sda6 44G 5.7G 36G 14% /common
“`
1. Finally we restart the NSX manager service
“`
/etc/rc.d/init.d/bluelane-manager start
Output:
Starting VMware NSX Enterprise Manager…
RabbitMQ Server is running.
pg_ctl: server is running (PID: 3599)
/top/vmware/vpostgres/9.6/bin/postgres “-D” “/common/db/vshield”
Setting the NSX Manager IP 10.10.10.10
“`

Massive thanks to Wilmer at VMware NSX technical support for how to perform this work!
Reference on how to gain root access: http://www.vsam.pro/how-to-get-fully-root-access-to-nsx-v-appliances-manager-edge-nsx-intelligence/